Monday, January 20, 2014

Mother Nature is a fickle woman !!

What a fantastic Iowa spring day! Sunday in the 50s, snow melting all over, just an amazing day. Except for one thing. It's January. We know it isn't going to stick around. In fact, snow is on the way and highs in the teens and more below zero temps THE VERY NEXT DAY. But these teaser days get me thinking about gardening, and gardening goes right along with cooking.

This year there will be some new additions to our garden. There are a lot of vegetables we have not grown before and this is going to be the year. Kale, for one. All my friends rave about it, Food Network is always using it in recipes, yet unless it's been snuck into a salad mix and I didn't know it, I don't think I have ever tasted it. Brussels sprouts too. I love to roast a pan full of Brussels sprouts tossed with bacon and roasted onion. Beets may join the party. I hear Brussels sprouts are a challenge to grow but I like at least ONE challenging plant every year so I think this year it will be these little guys. Roasted root vegetables are hard to beat for an easy and delicious side dish. My life experiences with beets have not been the best- from my mom opening a can of tasteless cubes and heating them, to horrible piles of "Harvard Beets" served at luncheons at different church functions, it's not been the best. Yet again browsing veggie catalogs I see such beautiful different beets and I long to roast them and try them in a whole new way. 

We use a ton of tomatoes around here, and the bulk of our tomatoes come from the farm and are canned at home for use throughout the year but we always make sure to grow a couple plants at home for eating day to day. There are so many wonderful heirloom tomatoes out there, and I could save seed and keep them coming year after year. Bell peppers- eh- they are hit or miss for us. We either have more than we need or not a single one, and again, those we can get at the farm. I do want to grow some super hot peppers again this year and have three different ones to choose from that I have never grown before. 

Every year we grown a TON of herbs for cooking. Last summer was a terrible year for our herbs so we need to catch up with several herbs. Basil is one we use loads of all year long and I need to get growing a forest of basil plants! Parsley is a big hit around here too. Italian flat leaf parsley is a great addition to salads, I love the peppery bite. And it's pretty hardy so a little snow doesn't usually kill it off. We had a very early spring last year but all was lost when we had a May snowstorm- the basil was killed and never fully recovered before the blazing hot, dry summer moved in. I barely had enough for fresh use. So early start in the house this year. Poring over the seed catalogs might inspire me to try some new herbs as well. I love lots of fresh thyme as well, and hopefully will grow several different types this year.

But let's forget the unusual edibles- flowers! I love to grow edible flowers. Everything from chive blossoms to nasturtiums, if it's edible in any way, I try to grow it. Even the humble wild violet makes an appearance on our table, in jelly, or just petals tossed into salad. Just be careful and know what you're picking and eating, and make sure it hasn't been treated with any chemicals! 

And you can't talk about spring in Iowa without talking about the wonderful wild foods that are everywhere- free for the picking, if you're willing to spend the time hunting. From tender stalks of wild asparagus growing roadside ditches to the famous and highly sought after morel mushroom, there are TONS of amazing wild edibles all over. Just plan on spending a day, and don't be too heartbroken if you come home empty handed a time or two.

Wednesday, January 15, 2014

Guest Chef- Mad Science from The House on Vine

Ohhhh my goodness, I have been bugging my friend Mary for a guest post for AGES !! Mary has been my friend for quite a while and we share a love for cooking,  wine and cocktails and entertaining. She is quite the hostess too- very skilled at plating and garnishing and plans to write a cookbook soon. I will be the first to add that to my collection, you can bet.

Mary, the Mad Scientist

When Mary is busy working on a cooking project she dons the garb of the mad scientist and sets to work in (use your Bella Lugosi voice here) her "labouratory." 

You won't find a lack of color and texture in the dishes either. Fresh veggies add color, crunch and healthy goodness. Her pasta dishes look like restaurant creations. Her soups are legendary! And she has a great eye for food styling with a collection of colorful and interesting serving pieces and dishes that add so much style- well, you will just have to see for yourself!!


So, without further ado- here is Mary the Mad Scientist's Winter Crab Stir Fry

1 cup shredded carrot
1 1/2 cups halved brussels sprouts
8 oz. sliced fresh mushrooms
1 can sliced water chestnuts, drained
2 cloves fresh garlic, minced
2 cups fresh kale, chopped
1 red bell pepper, cut into strips
1 package imitation crab
olive oil

Heat olive oil in large skillet. Add garlic and saute for just a few minutes but don't allow it to brown. Add pepper, brussels sprouts, stir fry for a few minutes, then add carrots, water chestnuts. Cook and stir a few more minutes, then add mushrooms, crab and finally, the kale. Give a quick little toss then pile mixture into large bowl. Add sea salt and pepper to taste, toss with 4 tablespoons of butter for a creamy finish.

For easy and quick stir frying,make sure all your
veggies are prepped and cut up before you
start cooking.
How about that ?? Fresh and delish! And in the middle of January it looks like a happy plate full of summer to me. And like any stir fry dish, so versatile- switch out what you have and don't have, or don't like. If you like some heat, hit it with a big pinch of crushed red pepper. Have an unexpected guest or two? Add a scoop of rice or asian style noodles. Swap out the meat or go all veggie! The possibilities are endless!!

Tuesday, January 14, 2014

Betcha thought pumpkin season was over ??

Pumpkin and cranberries linger on........ but this time in the form of a beer, a beer I have been hiding away for a couple months, waiting for time and inspiration to strike. Well, who am I kidding, I am always on the hunt for interesting brews for mustard making. I was hunting for this......I admit it. I always grab an interesting one to squirrel away for a future project. And since stores have been selling singles, it's easy to try just one of something without having to commit to a $10 six pack and not like it.


I found a very interesting fall brew made by New Belgium Brewing- "Pumpkick", a spiced ale with cranberry and pumpkin juice. Sounded interesting. Screamed autumn. Had to have it. I even tasted a wee bit of it- not bad, not bad at all.


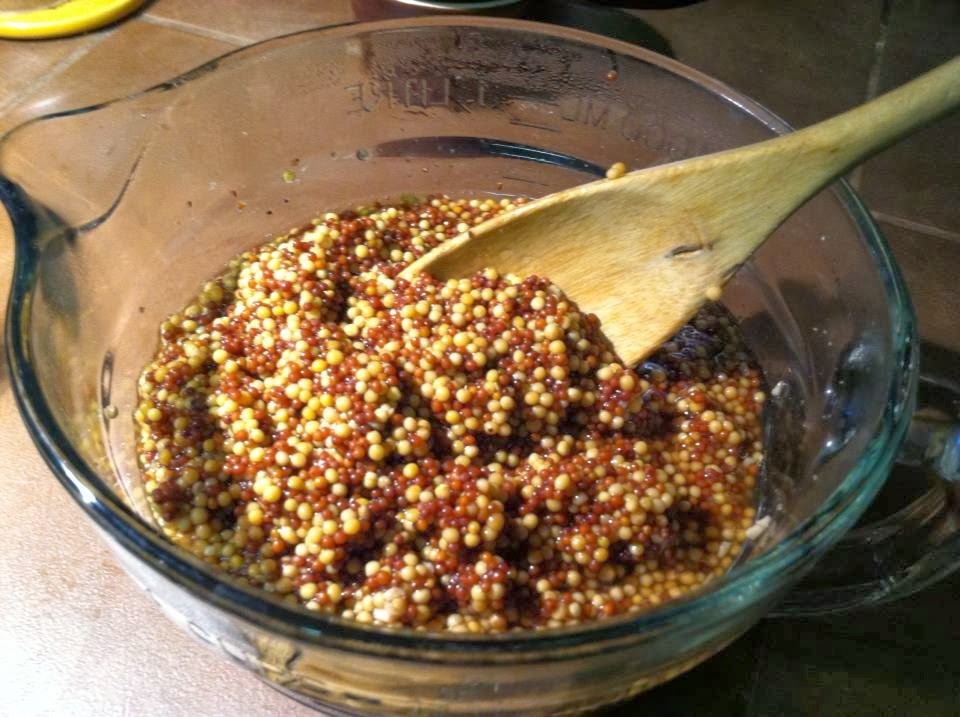
So let's get started on my mustard. I've made many and if you've been following my antics for any length of time you have seen the basic procedure- soak, season, blend, process. It's so simple I don't know why more people don't give it a shot. You don't even have to be a canner- prepared mustard keeps for ages in the fridge without having to process in a canner.


The ingredients used for this mustard are:

1 1/2 cups mustard seed (I used a mix of yellow and brown but you can use whatever you have or prefer)
1 cup apple cider vinegar
1 bottle beer
1 tsp salt
couple good grinds black pepper

That's your very basic grainy mustard mixture. Your choice of beer and any additional ingredients are what makes the mustard unique. 


Additions:
* Spiced pumpkin ale with cranberry as my beer choice
* 1/4 cup pureed cooked pumpkin (I may use slightly less, depending on consistency)
* couple tablespoons or so FINELY chopped fresh cranberry, cooked slightly in a splash of water (and again I will adjust accordingly depending on consistency) Actually I wish I'd had the foresight to save just a couple tablespoons of that beer- that would have been good !!
* 1 tsp minced fresh garlic

Place mustard seed, vinegar, salt, pepper and beer in glass bowl. Stir to mix. Cover and allow to sit at least 24 hours. I find 48 hours to be about the perfect resting time, to get all the yummy flavors infused in the seeds, and softened enough for a good grind. Seeds will soak up the liquid and plump up. When you are ready to proceed, remove mustard from fridge and allow to reach room temperature.


Prepare your add-in ingredients. Mix the garlic and cranberries into seed mixture, add about half the pumpkin puree. Blend in food processor to desired consistency- grainy like German mustard is my personal fave but you can blend til completely smooth if you prefer. I like to see the bits of good things in there. Add more pumpkin puree if mixture is too thin- you can also taste to see how your flavors are coming along. Remember- it's much easier to ADD MORE than to try and fix too much. So start small and add to taste.


One you've reached your consistency, place mustard into hot, sterile jars. If you don't want to process in a canner, label and date jars and store in fridge or freezer. If you share MAKE SURE to tell your friends it is NOT shelf stable- you don't want to make anyone sick. If canning, I use 4 oz jars and process in boiling water bath for 10 minutes.


Now I just can't wait for grilling season !! These are my favorite mustards for yummy grilled brats, or even a big plate of fried potatoes and sliced kielbasa (one of my favorite easy meals for a weeknight). Excellent with roast beef and ham too, you can add a great pop of flavor to a grilled ham and cheese sandwich, not to mention to endless uses in salad dressings, marinades and pan sauces. Deviled eggs with just a little something different your friends can't quite decipher! The best part of making your own mustard- you get exactly the flavors you want, from the brews you like, without a lot of added chemicals and preservatives. You can't get much fresher than that!

Saturday, December 21, 2013

Just call me Sweeney Todd of the Woods

Or maybe the Diamondhead Butcher. That's how I spent my day anyway- butchering. I felt like I was re-enacting a forensics scene. At least I wasn't the killer !!!!

Lots of people are concerned about what kinds of foods they are consuming these days. A lot of factory farms use too many chemicals/drugs in livestock production. Cows eat things cows aren't meant to eat. In the grand scheme of things, you can't get more organic than a humanely harvested deer. Venison is a very lean and delicious protein on top of the lack of chemicals and human interference. The chef and I are not hunters but we do have friends that hunt and share their bounty with us. This week we were given almost a half deer- on the bone still so we have to do our own "butchering".

I am not grossed out by cutting up raw meat, especially since this has pretty much been cleaned up- it looks like the big hunks of beef you see hanging in meat coolers. So armed with my extremely sharp Cutco knife (yes, that is a shameless plug for Cutco but they do make amazing knives), a plastic tablecloth, cutting board, and several bowls, I went to work.


First on the agenda, getting some beautiful slices for jerky. A lot of our hunter friends like the ground meat jerky but I like the real old-style sliced jerky- it has more bite and if sliced right, a nice texture. I got that done and set aside in jerky cure with marinade and continued on. I just used a simple marinade and jerky cure packet for this one- I will get to playing with flavors and cranking up the heat with future batches.


As I cut a large portion of the leg meat off I got a beautiful pot roast- cut perfectly against the grain so it will be perfect in the crockpot. Boneless and super lean this s going to be a real treat.


After that I worked on getting a much remaining meat off as I could. Mostly cubed, I plan on canning some and if I have room- getting some frozen for stews and soups.


Cutting up such a large piece of an animal is pretty hard work, and after about 3 hours of cutting I called it a night. I used a cheap party store plastic tablecloth to cover the table so I just wrapped it back up and stuck it back in the fridge for tomorrow.

I'm excited to use all this delicious venison in many tasty recipes and of course I will share them with you. I'm open to suggestions too! Just post in the comments if there is something you'd like to see, or a favorite recipe of yours- links welcome.

Monday, December 9, 2013

The Pumpkin Flour Project- Part 1


Do you ever get an idea that seems like a really good idea with just a wee touch of weird? I've been tossing this idea around in my head for a year- how to make flour from pumpkin. 


Why flour ? Well, I have been working on a recipe for almost two years- a lot of trial and error. Well, pretty much ALL trial and error. Using cooked pumpkin, dehydrated and ground into powder, didn't work AT ALL. I knew raw was the way to go.


Fall rolls around and I've been playing with this idea for some time and all the pumpkin patches are open, it's time to find the perfect pumpkin. And I do! I bring my pumpkin home and baby it lovingly until I have time to go on to the next step. Cutting up and cleaning a pumpkin is a super easy piece of cake if you're not trying to just scrape out the gooey stuff for a jack-o-lantern. I cut it up into manageable pieces, cut off the inside and loose crumbly pumpkin and cut off the peel. After slicing the whole guy into thin slices (it looked like I had a giant bowl of cheddar cheese squares) I spread them out in the dehydrator and let it dry completely.

Nine dehydrator trays yielded....... a smallish bowl of dried slices.

Once the pumpkin slices are completely dry, let them cool and store in airtight container until you are ready to grind into flour. I used a food processor because that's what I have- I doubt a grain grinder would have worked for dried slices.


I started grinding in the processor, then sifted out the flour from the little bits.

The little bits I ground by hand with my old fashioned spice grinder that came from Germany.

The little bits reminded me of instant mashed potatoes.

After a lot of grinding, sifting, regrinding, resifting, and grinding in the spice grinder, I ended up with just about 2 cups of pumpkin flour. What becomes of the pumpkin flour ??  You will have to stay tuned !! I guarantee it will be worth the wait !!

Tuesday, November 26, 2013

It's my steak, I can call it what I want !

Another cold Iowa night, and another excellent reason to break out the Le Creuset dutch oven and experiment. A quick mental inventory of some of the foods on hand, things I'd canned, what I needed to grab at the store and an idea is born.

But first, a little trip to Italy. As I have said before, my mother was born and raised in Germany, and growing up and as a young adult I've spent quite a lot of time in Europe. One of the most beautiful places I've visited is the largest lake in Italy, halfway between Milan and Venice, carved by glaciers in the Alps, the stunning Lago di Garda. 


The northernmost part of the lake is surrounded by the Gruppo del Baldo mountains. The lake has many small islands and five main ones. The lake is fed by the Sarca River, and it's outlet is the Mincio River.

Why am I telling you all of this? Well......because I can! And I am pretending to be Mario Batali because he knows EVERYTHING about the region from which he is cooking. Besides, I have plenty to talk about later when we get to the food.

Another interesting fact about this region is the mild climate. A lot of Mediterranean plants grow there that are extremely rare at the lake's altitude, like olive trees and even citrus in some areas. Tourism in this region is a booming business and if you ever get the chance to go, you'll fall in love.


So the point really has nothing to do with my recipe, other than it's Italian influenced flavors and it's very clever (I think so anyway) name: Steako di Garda. Hahahahahaha I crack myself up sometimes.

Now, let's get to the food.

Ready to go in the oven.

For this recipe you're going to need some pretty simple items. Steak- I chose lean round steak because I am going to slowly braise it but you can use any cut of steak you like that holds up to low and slow cooking. A medium bell pepper. I went with green because I needed the color, but use what you like or have on hand. Half an onion, sliced- and DON'T be one of those sillyheads who fall for that internet malarchy that saving half an onion makes it poisonous. That's a bunch of hooey. Save your other half for something else. A couple garlic cloves, sliced, and you're ready for that part.


You will also need about 2 cups of Italian seasoned tomatoes. I used some from my garden that I had cut up,tossed with Italian seasoning and froze in portions in freezer bags. You can use canned, home canned or store bought, or cut up enough fresh tomatoes to make about 2 cups and add some Italian seasoning. I also used a pint jar that I had canned containing cut up tomatoes, summer squash and zucchini. You can either use more tomatoes or skip it, or add fresh- whatever you have on hand.


I like to cook with as little mess as possible so when I opened my package of steak I flipped the plastic off and set the meat on the plastic and added about 1/2 cup of flour to the other half of the meat package. Disposable dredging station!


Start by heating a couple tablespoons of oil in a dutch oven. Add the sliced vegetables and let them sweat down a bit. Then scoot them to one side and begin searing the steak pieces. Add additional oil if needed.


As you finish them, pile them on the veggies so you don't need to dirty another plate. Once all the steak pieces (I had 4) are seared, spread the steak and peppers out in the pot, add the tomato mixture(s), a tablespoon or two of beef base or red wine if you have it, give it a quick mix, cover, and put in a 325 for a couple hours. The squash will probably break down but that's ok. This leaves a luscious flavorful broth.


I served the steak with hot buttered gemelli and crusty bread. 


Steako di Garda!!!


******Note:Pictures of Lago di Gardo courtesy of Wikipedia.

Sunday, November 17, 2013

Table for Two- Mexican Posole

I promised myself I would do it. I am going to cook my way through Table for Two- Back for Seconds. And I am soooo happy with my kickoff choice !!


Since we live in a small town, with a very small grocery store, we often get stuck in a food rut. I am always looking for something new to liven up the menu around the house. And as many of us know, cooking for two, and sometimes just me, can be a challenge. And then along came Warren Caterson's new cookbook. Things just got real interesting around here!! Mentally going over what was in my cupboard, I finally decided on Mexican Posole, a super easy to fix soup that looked very intriguing. For one thing, it uses salsa verde, which I had just canned a batch of and was looking for ways to use it, and it has cilantro as an ingredient. I am learning to embrace cilantro by MAKING myself eat it enough.

So Sunday arrives, and it's usually my day to cook, as my Chef is enjoying his weekend away from the kitchen. I assemble my ingredients, cook my chicken breasts in the oven, chop up the cilantro, and get everything ready. 


If I said this was a SUPER easy recipe for a weeknight dinner, I would NOT be lying. It comes together so quickly!! If I had precooked or leftover chicken I literally would have had dinner on the table in 15 minutes.


So I artfully arrange my ingredients on the board to take a picture, get that done, assemble the soup, dish up a bowl for Joe and a bowl for a photo and he says.........something's missing. Oh my....... I forgot to add the ONE INGREDIENT I was most excited to use !!! Back into the pot, add the SALSA VERDE and heat it back up.

Now we're talking!! This is perfection in a bowl. Delicious flavorful broth, the right amount of heat (for us- I made my own salsa verde but you can use whatever brand/heat level you like) and tons of meaty chunks of chicken and hominy- if you're not familiar with hominy- get some!! It's delicious !! And the cilantro? It's perfect !! The perfect amount of freshness, not the soapy taste I often get from cilantro. I'm learning to love this stuff !

Sadly, I am not going to share the recipe for you. You NEED TO buy this cookbook!!!! You can get your copy by clicking here. You will love it- I promise.

Now I can't wait to pick out my next recipe to make !!