Showing posts with label stuffed. Show all posts

Friday, March 23, 2018

Laurie's Stuffed Chicken Breasts


I have told you a bit about Laurie before in a couple different posts. She began her career path in a very different direction, and ended up finding her passion in the restaurant business. Even though she is the textbook single girl with a very demanding work schedule she still finds time to cook at home on occasion and she comes up with some pretty delicious combinations. You can see the influence fine dining has made on her. She likes to cook with beautiful ingredients, lots of fresh vegetables and fruits and loves creating not only delicious dishes but beautiful dishes as well. Colorful plates, attractive combinations. This is one apple that definitely did not fall far from the tree, she absolutely has my love of food and cooking. In her current role, she is the general manager of Magnolia Wine Kitchen, a beautiful restaurant in the heart of downtown Des Moines. Situated in the Western Gateway part of downtown, the restaurant sits right across from the sculpture garden and features huge floor to ceiling windows overlooking the park, and a hip little patio tucked in the alley next to the building. The dining room is decorated with women in mind. Soft colors, plush seating, gorgeous artwork dots the walls. The wine bar features an outstanding selection of wines that changes often. Craft cocktails also are a feature of the restaurant, with Chef Nico creating amazing specials each week in the kitchen.

One of her many creations
Laurie may be front of the house for the most part but she is not afraid to jump in the kitchen and cook when she needs to. She always challenges herself to learn not only the recipes on the menu but to actively help in planning specials and other events. During the recent Culinary Food Fight she served alongside Chef Nico as his sous chef, preparing many of the items with him. I love this about her, she takes those skills she learns on the job home, and re-imagines them as something a home cook can produce just as easily. Tonight, as she was snapchatting me pics and details of her dinner she was making at home, you could see the influence of a restaurant chef in her description and technique. Her dish was a wildly creative mix of sweet and savory, acid and creamy. I knew I'd be stealing this idea! I made a few adjustments in technique, where she butterflied and stuffed the chicken then baked it, I am pounding out the breasts, stuffing, then rolling up, dredging in flour and sauteing before finishing in the oven. It's going to be delicious. Let's get cooking.

Laura's Cherry, Feta, Apple Stuffed Chicken

4 boneless skinless chicken breasts
salt and pepper
1 cup dried cherries
2 cups baby spinach
1 Granny Smith apple
1/4 cup dry red wine
1 cup crumbled feta cheese
3 scallions
all purpose flour
butter
olive oil

Pound the chicken breasts to 1/4 inch thickness. Season with salt and pepper. Set aside.

Combine the dried cherries with the red wine and set aside. Chop the unpeeled apple into small dice. Slice the scallions, white and green parts.

Heat a swirl of olive oil in a small skillet. Add the apple and scallion and cook for a minute or two. Add the cherries with the wine and cook over high heat for a minute or two until the wine is almost evaporated and the apples are almost tender. Remove from heat and cool slightly.

Laurie likes to serve roasted root veggies.
On each chicken breast, place a layer of baby spinach leaves. Divide the apple mixture between the chicken and sprinkle with feta. Roll up tightly into rolls, securing with toothpicks or cooking twine. I prefer cooking twine- it makes it easier to turn and brown the chicken.

Laurie's finished dish.
Heat the oven to 400 degrees and heat a large oven safe skillet over medium high heat. Add a couple tablespoons of butter and a couple tablespoons of olive oil to the skillet. Dredge the chicken rolls in flour, then add to the skillet to brown on all sides, then place in the oven to finish cooking for about 15-20 minutes. Allow chicken to rest for 5 minutes before slicing and serving.

Monday, August 31, 2015

Hatch Chilies- Put That In Your Sandwich And Stuff It

It's Hatch chili time again. Last year I roasted them, peeled them and made salsa. This year I want to do something different that really puts the pepper right out there to enjoy. I heard the Hatches were back in the big grocery stores so I went on a quest to find them. I struck out at the first store, where I had got them last year. Darnit. I was afraid I might have waited a couple days too long and was going to miss out. A quick plea to my friends on social media connected me with the right locations and Hatch chilies were acquired. Whew!


I'm not just playing with these guys though. I stopped at the local farmers market a couple days ago and snagged a nice bag full of gorgeous hot banana peppers- some yellow, some red. I love these guys! I have some great memories of banana peppers- my dad always grew them in the garden, my mom always made fried peppers and onions with dinner in the summer, and from my waaaay back years I remember getting a nice butt-paddling after overhearing my dad call the peppers in a neighbor's garden "bananas" so I went and picked them. All of them. Oops.

Of course no pepper experiment would be complete without America's favorite pepper- the jalapeno. To use them in this recipe I had to hunt down really good sized ones, and even at that, I'm going to tell you guys- don't bother with jalapenos. The banana peppers were thin and pliable and super easy to clean. Same with the Hatch chilies, but the jalapenos and their thick "meat" were really tough to get in there and get all the membrane out. If you REALLY must, they are delicious, but labor intensive. 

Growing up, one of Mom's summer specialties was the good old stuffed bell pepper. She made a simple stuffing- hamburger, rice, onions, tomatoes, some diced pepper, seasonings, piled into bell peppers and draped with slices of cheese, then baked until the cheese was browned and delicious. Nothing gourmet, but just really good and homey. I loved them. So as an adult I find myself experimenting with not only new pepper types and heat levels, but often revisiting those classic dishes and recipes and making them more "me" and more my cooking style. 


If you're not an Iowan you will never understand the deep rooted love we have for our Graziano's* Italian sausage, although I'd be willing to bet you have your own local favorite. For us Grazi's is the Holy Grail of sausage, for pizza and pasta and for fantastic Italian sausage sandwiches. We love our Grazi's cooked, draped with marinara sauce and cheese and served on crusty bread. I'm swooning just thinking about it. Many people like to pile theirs with grilled onions and peppers. All these flavors seemed to be speaking to me as I pondered what to make with the peppers I have, and then it hit me. Why not take that sausage, add some breadcrumbs, cheese and a little of my homemade habanero pizza sauce, squish it until it's meatloafy (yes folks, that IS a professional culinary term, I promise) and stuff it in those peppers? Genius! I couldn't just do a stuffed pepper though- that's too obvious and every day, and I wanted to do something completely different and that, my friends, is how Stuffed Pepper Po Boys became a thing.


Simple ingredients, you choose the heat level you like in your sausage, in your sauce. I used homemade habanero pizza sauce, but marinara or regular pizza sauce works just fine. Add crushed red pepper to any part of this dish- the meat, the sauce, sprinkle it on top. Use hot Italian sausage or mild, it's totally up to you. It is going to be delicious.

Stuffed Pepper Po Boys

1 lb Italian sausage
3/4 cup dry breadcrumbs
1/2 cup marinara sauce
1 egg
1/4 cup minced onion
1 cup shredded mozzarella
10-16 peppers
additional marinara sauce
additional cheese
crusty baguette bread

Prepare the peppers- use a sharp knife and cut the stem end off. Carefully run the knife down the length of the pepper on ONLY one side- do not cut the pepper in half. Spread the pepper open and remove seeds and membrane and set aside. 


In a medium bowl combine the sausage, marinara sauce, egg, breadcrumbs and cheese. Mix well with your hands.


Again, spreading the peppers open with your fingers, stuff the meat mixture into the peppers, mounding slightly. Spoon a little additional marinara sauce on top of each pepper, spreading it out a bit. Place on a baking sheet and pop in a 375 degree oven for 35 minutes.


Remove from oven when done and turn on the broiler. Sprinkle each pepper liberally with shredded cheese. Place under the broiler until the cheese melts and starts to turn brown. Remove and let rest a few minutes.


Cut your baguette into sandwich size pieces and split in half. Spread with softened butter (garlic better is awesome) and broil until toasted and starting to brown. 

The stuffing stays so juicy- yum! You can serve with additional
sauce for dipping if you like, but it's not needed.
Top each baguette bottom with stuffed peppers to fill the sandwich. Top with the upper piece of bread and enjoy.

You can add any additional toppings you like, just like in the sub shop. I prefer to keep mine simple so I can enjoy the fresh peppers and that incredibly delicious Graziano's sausage. 


* I realized as I was writing this that we have not had an official Foodie Field Trip to Grazi's yet- so look for that in the very near future! Graziano's is an old old neighborhood grocery store with an incredible selection of Italian products, fresh meats, marinated olives, fresh baked breads and pasta.

Friday, March 20, 2015

It's the weekend- might as well make some meatloaf

Why did meatloaf end up with such rep anyway? I actually LIKE it! It's the perfect comfort food, something you can get in almost every diner, maybe something you remember Mom making when you were little. I love the classic meatloaf with a drizzle of ketchup baked on the top, and once in a while I like to jazz it up a bit.

Meatloaf is easy to upgrade. Different meats, different toppings, different things tucked inside. We are big fans of mushrooms around here and I had some to use up so of course- mushroom stuffed meatloaf came to mind. Chopped up, tossed with some onion and garlic, it's a quick and easy stuffing with lots of flavor. A quick glance through the fridge and I also have half a package of bacon to use up so I grab that, chop it up, get it going in a pan....... and the rest is history.


Lakehouse Stuffed Meatloaf

2 lbs ground beef
8 oz package mushrooms
1 small onion
6 cloves garlic
1/2 cup beef stock
2-3 tablespoons cooking oil
half pound bacon
3 slices stale bread
2 eggs
salt and pepper or meat rub of choice


Clean the mushrooms by wiping with a damp paper towel. Trim the ends off the stems and chop the mushrooms. Finely chop the onion and garlic. Add to mushrooms and set aside.


Cut the bacon into small pieces and place in a skillet. Cook the bacon until browned and crispy, drain on paper towel and set aside. Drain off the fat. I don't like to cook mushrooms in bacon fat- they absorb too much of the fat and then everything is overwhelmingly bacon flavored. Add the cooking oil to the skillet and when hot, add the mushroom and onion mixture. 


Cook over medium heat until onions are softened and mushrooms start to brown. Add the beef stock, raise heat to high and cook to evaporate the liquid. Remove from heat and allow to cool slightly.

In a large bowl, crumble the ground beef. Crush up the stale bread into crumbs, season with salt and pepper of a good meat seasoning/rub (we like Feiny's Everything) and mix together with the eggs. Don't over mix but make sure the eggs and bread are fully incorporated.

Place a large sheet of waxed paper on the counter and pile the meat mixture in the center. Pat out into a rectangle about 10x15 or so, make sure you keep in mind the size of the baking pan you're going to use. Spread the mushroom mixture over the meat as evenly as possibly.  Sprinkle the bacon over.


Grasp the long edge of the waxed paper and lift, rolling the meat over the mushrooms away from you and continue until you reach the other end. Seal as well as you can. Use the waxed paper to help transfer to an oil baking dish, and place the roll seam side down. 


Bake at 325 degrees for one hour. Remove from oven, pour off any grease in the pan and cover loosely with foil; allow to rest at least 15 minutes before slicing.


Served with mashed potatoes and homemade gravy instead of the ketchup drizzle, this was such a tasty take on meatloaf. The bacon pieces stay quite crunchy during baking and it's easy to slice after that rest time. We had lots of leftovers too- and I love a cold meatloaf sandwich the next day.

Disclosure of Material Connection: I have not received any compensation for writing this post. I have no material connection to the brands, products, or services that I mentioned. I am disclosing this in accordance with the Federal Trade Commission's 16 CFR, Part 55: "Guides Concerning the Use of Endorsements and Testimonials in Advertising."

Sunday, September 28, 2014

Jumping Off the Bacon Bandwagon

Are you as tired as I am of the Bacon Bandwagon? Don't get me wrong, I love the stuff, but it's everywhere. Breakfast, lunch, dinner, even cocktails and candy. We've done the bacon-wrapped thing here too but I was looking for something a little different, a little more refined. Prosciutto came to mind when I was pondering my options. I knew I was going to use it to roll something, but exactly what I wasn't sure yet.


Exactly what is prosciutto? Well, the short answer- ham. It's a dry cured ham that's usually cut super thin and served in many different dishes. It's cured and not cooked. Typically made from the leg of a pig or wild boar, it can take as long as two years to cure and craft the perfect prosciutto. You need a cool and damp environment to have a good prosciutto. Too warm and the meat is going to soil and be inedible. If you don't have a lot of humidity, you're just making jerky.

What do you do with it? Almost everyone has seen it wrapped around wedges of juicy melon. It might be wrapped around bread sticks or asparagus and roasted. It might be tossed with pasta and a creamy sauce, or cut up and sprinkled on a pizza when it comes out of the oven. Saltimbocca is a classic Italian dish in which pieces of veal are topped with a sage leaf and wrapped in prosciutto. Of course, many a panini is made with prosciutto too. I thought about using it in an appetizer using cubes of chicken and a sage leaf but we just don't need that many appetizers for the two of us. Instead, I have decided to stuff my chicken breasts with a garlicky, herby goat cheese and wrap them, baking until the prosciutto is crispy and brown and so delicious. So non-bacon.


Goat Cheese Stuffed Chicken with Prosciutto

  • 2 boneless, skinless chicken breasts, butterflied
  • 3 oz goat cheese, room temperature
  • 1 tsp minced garlic (one small clove)
  • butter
  • 1-2 tsp minced fresh thyme, chives, parsley, plus more
  • prosciutto
  • salt and pepper

Butterfly the chicken breasts- this makes pounding so much more efficient and you don't have to beat the heck out of the chicken to get it the right size for rolling. 


It's super easy to do-place your hand flat on the top of the chicken breast; using a sharp knife, slice the chicken breasts horizontally but NOT all the way through. Lay open the chicken- voila! Place the chicken between sheets of plastic. Lightly pound them with mallet or heavy rolling pin to 1/4 inch thickness. Season with salt and pepper.


In a small skillet melt a tablespoon or so of butter. Saute the garlic for a couple minutes until softened but not brown. Crumble the goat cheese into a small bowl. Add the garlic and herbs, mix well. 


Divide between chicken breasts. Spread or pat the goat cheese evenly over the chicken. It doesn't have to cover every bit of the meat, just evenly. Roll up the chicken.


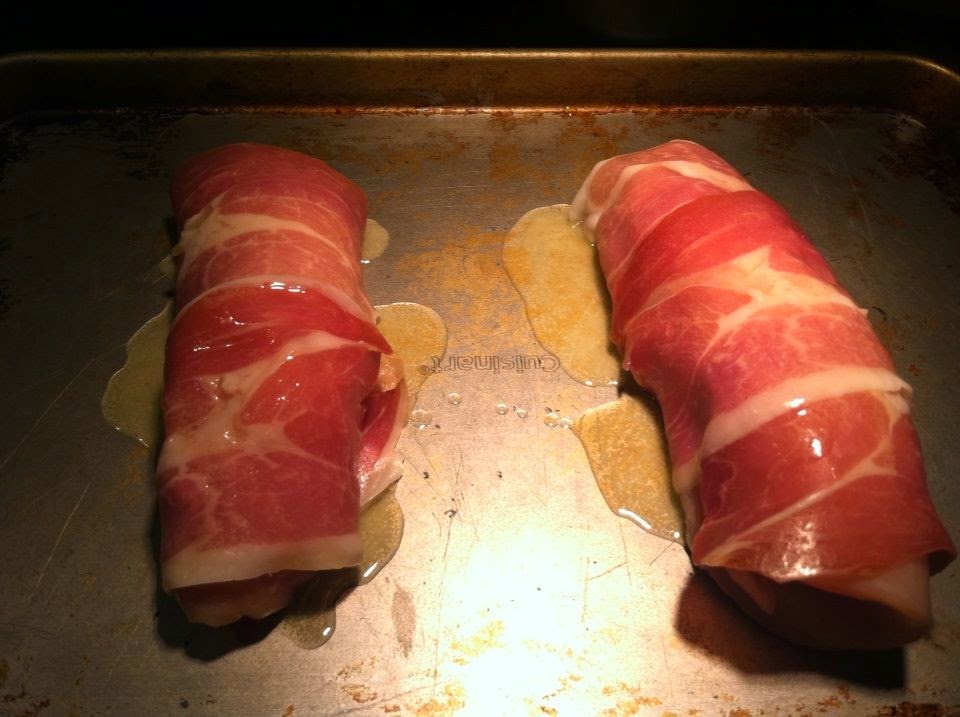
Using slices of prosciutto, wrap the chicken rolls, and secure with picks. Place on shallow sheet pan. Drizzle with a couple tablespoons of melted butter. Note: If you use a high-sided pan it's much harder for the prosciutto to crisp up nicely. It sort of steams the rolls and we don't want that.


Bake at 375 degrees for 25-35 minutes until chicken is done. While the chicken is in the oven, get your sides together. Sprinkle chicken with additional fresh herbs and serve.

I served the chicken with mashed potatoes made with a little roast garlic, minced fresh herbs, drizzled with the pan drippings from the chicken, and sauteed baby zucchini. It was so delicious! It smelled amazing in the oven- like Thanksgiving dinner- seriously, like a roast turkey, and the prosciutto was SO MUCH BETTER than bacon- super thing, crispy, no flab even on the bottom. The goat cheese added the delicious tangy twist that chicken needs, and is really a blank canvas for you to play with herbs, spices, flavors. Give it a try!

Monday, March 26, 2012

A Very Crabby Monday

Wow !!! It's been a long time since I've sat down and put a post together- quite honestly with our crazy schedules around here I haven't spent a lot of time in the kitchen, and neither has the Chef. So now that spring is in full swing, the herbs are growing like crazy in the garden and it won't be long til fresh veggies again grace our table, it's time to get back in the kitchen.

Normally on a night the Chef is working I don't cook a "real" dinner for just me. But today I thought it would be fun to throw a little something together and see how it turns out. Taking a quick inventory of the freezer I found tilapia filets, some flaked crab meat, some green beans from the garden......rummaging through the cupboard yields some breadcrumbs  and fresh garlic, and a quick trip out to the deck results in a handful of freshly minced chives. I'm all set !!

Crab Stuffed Tilapia

3 tilapia filets
about 1/4 cup flaked crab meat (do yourself a favor and use the real deal, that fake stuff just won't do)
about 1/2 cup dry bread crumbs
1 clove garlic, finely minced
1/4 tsp or so shredded lemon peel
salt, freshly ground black pepper
pinch of thyme
big pinch of chives
3 tb butter
1/2 tsp chicken base or stock concentrate

Rinse the fish and set aside.


In small bowl toss the crab, bread crumbs, seasonings and set aside.


In small skillet melt the butter and briefly saute the garlic until softened but not brown. Add about 2 tb water and chicken base, stir til dissolved. Mix into crab mixture.

In a small plate place a fish filet. Divide stuffing into 3 equal portions and place one part on fish. Fold the filet over and secure with toothpicks. Repeat with remaining fish.


Place in buttered baking dish, top with a small pat butter and sprinkle with lemon pepper, lemon herb seasoning, whatever you like. Bake at 350 degrees for 30 minutes or until fish flakes easily.


I served the fish with garlicky green beans- I cooked a small amount of frozen green beans in a little water til almost done, added a couple tbs butter and a minced garlic clove and continued cooking til just barely tender and still a little crispy.


And that is my big kitchen experiment for the day. Tomorrow is the Chef's day off so he will be hard at work in the kitchen and I will come home to an amazing meal.......ahhhh what a life !!

Thursday, October 27, 2011

I'm all about recycling !!!

Recycling. Going green. Electric cars (speaking of which, our little Chevy dealer in Stuart had a Chevy Volt on the lot yesterday- I really liked it !!!). Those seem to be the big buzzwords these days. So, not wanting to be socially irresponsible, I've decided to do a little recycling of my own tonight. Food recycling that is !!

You might remember a couple weekends ago I had a little all-day cookathon for myself. The Four Raviolis (sounds like superheros doesn't it ?). One of them was a seafood ravioli with a yummy filling of ricotta cheese, shrimp, crab and langostino. I had more filling than I needed so I tucked it away in the freezer for safekeeping. While sitting at work today munching on Puffcorn my mind wandered into the freezer......and thought about that filling......and since the grocery store is right next to my office, I toddled over there and grabbed a package of mushrooms.

Once I got home the rest was easy- thaw the filling til it's soft enough to spoon/mound. Melt a little butter. Mix some dry breadcrumbs, parmesan cheese and parsley in a shallow dish. Pull out the mushroom stems. Mound the seafood filling in the mushrooms, dip the tops in the crumb mixture, drizzle with melted butter and bake. Voila !!! Seafood stuffed mushrooms, or as an environmentalist might say, Mushrooms with Recycled Seafood Stuffing.

Friday, October 7, 2011

Dining al fresco in my own yard

Autumn in Iowa is such a lovely time of year. Warm breezy days and cool evenings make it perfect for a light dinner on the deck. The Chef and I were celebrating a little good news (more on that to come.....) with a couple cocktails (Jager bombs for me and ice cold brewskis for him) on the deck and I thought a nice light dinner of appetizers would be great.

The first recipe is another one of my "MacGuyver Recipes"- which is an old family inside joke about me taking ice cubes and black pepper and creating a 3 course meal. I've been hearing about something at a local restaurant called Chinese Cheesesticks and knowing what they were, figured I could wing it. That restaurant serves them with marinara sauce, not very "chinese" if you ask me, so I worked some magic on a bottled sauce and came up with a sweet spicy dipping sauce I hope you'll love.

The second is a bittersweet recipe for me, one shared by an old friend with whom I have lost touch. A misunderstanding and some interference from a not-so-nice person caused the friendship to end. I miss her, but I still have the recipe for Sandy's Stuffed Mushrooms to remind me of happier times.

Ok, so, let's start with my version of Chinese Cheese Sticks


1 block mozzarella cheese
1 pkg small wonton skins
oil for frying

Cut mozzarella cheese into small sticks or slabs


On clean work surface lay one wonton wrapper (these are the smaller square ones so cut the cheese slices so they will fit as shown below)


Place one piece of cheese diagonally across the wonton wrapper


Moisten the edges all the way around the wrapper with a little water then tuck the corners over the ends of the cheese


Fold one corner over and roll up to look like a little burrito. Set aside until you've finished all the rolls.


Heat oil in pan or deep fryer until 375 degrees. Fry, turning if necessary until golden brown on both sides.


They brown up quickly and you want to make sure you've sealed them up really good so the melty cheese doesn't leak out. Drain on paper towel and keep warm til all are fried. Serve with dipping sauce.

Pineapple Dipping Sauce

1/4 cup pineapple sundae sauce
1 tb dark rum
salt and pepper
1 tsp crush dried hot pepper flakes (use whatever kind you like)
2 or 3 dashes hot pepper sauce such as Tabasco

Mix all and heat about 30 seconds in the microwave. Stir and serve with cheese sticks. Also would be good with eggrolls or chicken wings !!


Since the Chef and I are mushroom lovers, I thought I'd whip up some of Sandy's Stuffed Mushrooms and see what he thinks- they were, as always, a HIT !!


Sandy's Stuffed Mushrooms

1  oz package whole mushrooms ( a little on the small size works great for one-bite appetizers), wiped clean and stems removed
1 pkg cream cheese with chives (you can use plain cream cheese and add chives, I used a pkg of Boursin cheese - spring onion and garlic flavor)
palmfull shredded asiago or parmesan cheese
1 cup breadcrumbs
additional couple TBs cheese
melted butter
chopped parsley if desired

Allow cheese to soften at room temperature until easy to spread. Mix in palmfull of cheese. Using small spreader, fill mushroom caps with cheese mixture, mounding slightly.


Melt butter and place in shallow dish. Combine bread crumbs with additional cheese and add a little chopped parsley if you like (I think it looks prettier)


Roll the mushrooms in the melted butter and coat with breadcrumb mixture. Place on baking sheet sprayed with cooking spray. Drizzle a little butter over them if desired. Bake at 425 degrees about 15 minutes. If you like, run them under the broiler to brown up a little if needed.

Sprinkle with additional parsley if desired and serve !!

Now tonight the Chef is working some magic on chicken wings....I heard the words "ghost chile" being used in the kitchen.......YIKES !!!!!

Tuesday, August 23, 2011

The Best Part of Summer- Dinner From the Garden

Seems like we can't even use the dining table these days !!!! There are vegetables everywhere !!! The hot peppers are growing like weeds and every day, sometimes twice a day, we are picking peppers. Our herbs have all gone crazy as well.  Our "suffering" means you guys get yet another recipe using our garden vegs !! Sorry about that.......


The Chef's Stuffed Peppers
.....
large bell peppers (he used 5, use whatever quantity you need, you may need to make additional filling)
1 lb ground beef
1/2 large onion, chopped
salt and pepper
The Chef's red sauce (use whatever spaghetti/marinara sauce you like)
additional small peppers and tomatoes
mozzarella cheese
pasta of choice, cooked
parmesan cheese for serving
.....
Begin by browning ground beef and onion, season with salt and pepper. Drain off fat and set aside. Prepare peppers
by cutting off the top and removing seeds and membranes. If you prefer, cut peppers in half and stuff the halves. Arrange
in baking dish, fill with meat mixture. Surround with additional small peppers and small tomatoes (he used banana peppers, Jamaican yellow mushroom peppers, cherry tomatoes and small romas). Bake at 375 degrees for about 30-45 minutes or until the peppers are done to your liking (we like crisp/tender so 30 minutes is all we needed). Remove from oven and sprinkle with mozzarella cheese, return to oven until cheese is melty and starting to brown. Serve peppers and roasted vegetables alongside pasta with red sauce over all. Sprinkle with parmesan cheese if desired.


Soooo delicious !! Made me wish I had baked some homemade bread to go with !! Now we're both just impatiently waiting for the weather to cool and the "winter food" season to begin.