Wednesday, September 30, 2015

Sitting Down With a Good Book- The French Laundry Cookbook

A while back I spent the night at my daughter's house. I never pass up a chance to spend the night and watch over her "kids"- Napoleon the Chihuahua and Sebastian the Siamese cat. It was a mini-vacation of sorts, a time for The Chef and I to have some necessary alone time and a chance for me to unwind with a really really good book- Thomas Keller's The French Laundry Cookbook.

You might remember meeting my daughter Laura in a prior post about all the food industry pros in my family. She manages a popular restaurant downtown Des Moines and, just like her mom, has an interest in enjoying good food of all kinds and learning as much as she can about the culinary field. I was beyond delight when I found out she had this amazing cookbook and couldn't wait for the next overnight. I thought I had my chance back on Valentines Day, but Mother Nature threw a wrench- and a snowstorm- in my plans and caused my daughter to abandon her plans to travel. 


Staying in her adorable little bungalow is a real treat. Nestled in the historic Beaverdale neighborhood in Des Moines, the house is so cute, decorated beautifully, and a true oasis from an otherwise hectic world. Warm hardwood floors, soft and soothing wallcolors, modern and eclectic art on the walls and contemporary furniture bring it all together in a very inviting way. No heavy curtains dragging the windows down, she instead chose the clean lines of wooden blinds, in white to match the wood trim. Scented candles ensure her home has a welcoming fragrance, even if they aren't lit. 

What makes this house such a respite from the chaos outside? It's quiet. There is no cable tv, no satellite tv, no internet. No distractions. No noise. No commercials, no sitcoms, no bad movies. Why is this so wonderful? In her life, particularly, noise is part of the job. As a busy restaurant manager she s always on the go, always putting out fires, dealing with employee and customer needs, back office, front of house, customer service, scheduling, labor costs, overhead, ordering- you get the idea. So here I am, in this little haven, just me and the fur kids, and THAT cookbook.


The French Laundry is a restaurant in Napa Valley, California, but you probably already knew that, and Thomas Keller is the owner/chef. The son of a restaurateur he began his career working for his mother in her restaurant and drawn in by the magic of Hollandaise sauce he took off, cooking and apprenticing at some of the most incredible restaurants in the world. Many awards have been bestowed up Chef Keller. In 1999 he published The French Laundry Cookbook and the world has not been the same since.

And so I finally got my chance to settle in to the corner of that comfy sectional ouch in that quiet little bungalow with no electronic distractions, and slowly turn the pages. I am immediately drawn in. I had heard from other food nuts that the cookbook is pretentious and unrealistic- that no home cook could or would ever prepare these recipes. Pure nonsense. Honestly, with the exception of a few recipes involving an entire whole foie gras roasted or poached (and who can afford that??) everything in the book was very accessible to the regular cook like me. I am quite obsessed by canapes, hors d'oeuvres and cocktail party foods, and the first chapters filled my heart with joy. Pastry cornets filled with salmon tartare- the only way I can stand salmon is raw, and pastry work is my niche, how can I possibly NOT want to make this recipe? Quail eggs and bacon- a no brainer. Yukon Gold Potato Blini. Again, this is absolutely something I would make. 

I made a list. Things I Am Going To Cook From The French Laundry Cookbook. You better believe I did. First on the list? The Lobster Broth. The technique is fairly simple, not unlike stock-making,and the ingredients are not that out of line for a regular person like myself. I can come up with lobster bodies. Tarragon is growing in the garden. The rest is easy peasy. I wonder if I will be able to find anyone to volunteer as a taste-tester?

Thomas Keller's Creamy Lobster Broth

1/4 cup canola oil
3 lobster bodies, cut up
1 1/2 cups chopped tomatoes
1/2 cup chopped carrots
1 bunch fresh tarragon
2 cups heavy cream

Heat the oil in a large rondeau or deep straight-sided braising pot. Add the lobster bodies and sear over medium high heat for 1 to 2 minutes on each side, until they turn red. Add the tomatoes, carrots, and tarragon, cover the shells and vegetables with water, and bring to a boil. Skim off any impurities that rise to the top. Reduce heat and simmer for one hour. Strain the stock through a large strainer, pressing on the lobster bodies with a wooden spoon to extract as much liquid as possible. Strain again through a chinois into a saucepan. Return the strained stock to the heat and simmer until it is reduced to 1 cup. Add the heavy cream. Return to simmer and cook until reduced to 2 cups, skimming as necessary. 

To serve, heat in a saucepan, whisking to a slight froth. Serve in demitasse cups as a light hors d'oeuvre

Sounds amazing, doesn't it? My dream vacation would include a meal at The French Laundry, among others. This sounds like an extravagant dish to prepare but really, 3 lobsters aren't all that expensive if you catch them on sale. I've seen them in our local gourmet market for under ten dollars for a lobster- which would be perfect for a nice lobster dinner, and reserving the bodies for this recipe. Even the technique is not too technical that even a beginner couldn't reproduce this beautiful soup with ease. This one is destined to be a favorite around here.

Disclosure of Material Connection: I have not received any compensation for writing this post. I have no material connection to the brands, products, or services that I mentioned. I am disclosing this in accordance with the Federal Trade Commission's 16 CFR, Part 55: "Guides Concerning the Use of Endorsements and Testimonials in Advertising."

Saturday, September 26, 2015

Bacon Isn't Going Away Anytime Soon

I know I said bacon is so last year. It kind of is, but it's still delicious, and we're all still gobbling it up by the ton every year. How well do you know your bacon facts? 

The average slice of bacon is 1/16 of an inch thick, and about 16-20 slices per pound. This sliced bacon, which I have never seen, is 1/32 of an inch, and thick sliced measures up at 1/8 of an inch, which yields 10 to 14 slices per pound. Two slices of regular bacon, in spite of appearing to be mostly fat, seem pretty diet-friendly at 73 calories. In the United States over 60% of restaurants have bacon on the menu. At the breakfast table, bacon clobbers the other breakfast meat, beating out ham and sausage and making up nearly 50% of meat eaten at breakfast! A survey of U.S. households revealed over 80%of households purchased bacon in 2013 and 2014. The average American eats about 18 pounds of bacon every year. **

That's hard to imagine. I'd like to meet these "average Americans"- I certainly am nowhere near 18 lbs. of bacon! 

As you know, I got to visit a modern pork producing farm earlier this summer and got to meet the baby bacons literally at the moment they were entering the world. It's amazing that on one farm those baby piglets will grown up, be weaned, and move in graduating barns as they grow up, until they reach market size and....gulp.......go off to the pork plants. I'd rather not dwell on that part, because pork is just so delicious, and I am so thankful to get to see how invested the farmers and producers are in the animals' welfare that it does give me some level of comfort. 

Once we have passed the unpleasant stage of meat production, we have, well, meat. In this case pork, and if it's going to become delicious bacon it's got to be cured and smoked. A lot of folks have been busy curing their own bacon at home in recent years, perfecting their techniques, the cure mixtures, smoking temps, even the cut of meat can be a bit off the track. My friend Ross, from STATE, often uses part of a pork butt to make home cured bacon instead of belly. This must make one of the leanest bacons imaginable. Another friend, Marty, from Ohio, goes the more traditional route using pork belly. He shares his technique and recipe HERE.


Check out Marty's bacon- perfectly hand sliced even!
I noticed in Marty's directions he mentioned smoking to an internal temp of 150 degrees by smoking at 200 degrees. Amazingly that was something my friend George, a professional chef and master of all things food, mentioned I asked him about curing your own bacon. He balked at the recommendation but didn't say what temps he shoots for when curing and smoking meat. Trade secrets and all, you know? Dan, from Waterloo, says he warm smokes bacon and even does a vegan bacon. You might remember Dan- he is the pit master at Phat Kat Barbeque and is a barbeque judge and has shared food stories with us before. 

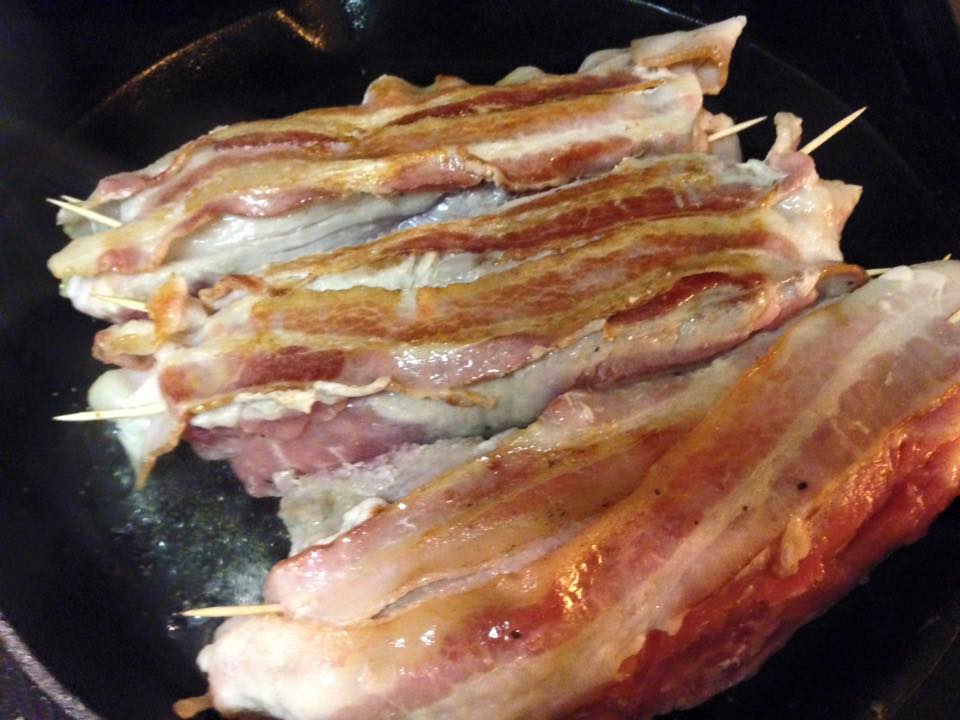
All this bacon talk has got my mind whirling. I happen to have some bacon, not a lot, but enough to do something with....... and some bone-in country style ribs, a cast iron skillet, and untold numbers of herbs, spices, sauces and condiments around I bet I can whip something up really quick- like this Recipe Free Dinner.


Easy to do- season the bone-in pork country style ribs with salt, pepper, whatever meat rub you like and lay two slices of bacon on each one, lengthwise, securing with toothpicks. Heat that cast iron skillet til it's nice and hot, then place those ribs in there, bacon side down, and let them cook til the bacon is starting to brown. Flip em over, pop the skillet in a hot oven to finish (145 degrees for perfect juicy pork). Sauce them if you like, and serve.


We can't be totally recipe free however, so I am going to share a recipe that was shared with me, and since we're on the bacon topic- well, you just need to try this. Bacon jam. Yep. Jam. You know I am always checking out the latest unique and artsy fartsy condiments, and when a friend was telling me about this one- I became hooked. I have no idea where the original recipe came from- she passed it on to me and I'm passing it on to you guys. I can see millions of possibilities for using this stuff to make amazing dishes. I plan on keeping my freezer stocked from now on. Let's make some!

Bacon Jam

3 lb bacon, cut into pieces
4 large sweet onions, chopped
8 cloves garlic, minced
1 1/2 cups leftover strong coffee
1 cup packed brown sugar
1 cup cider vinegar
1/2 cup maple syrup
1 teaspoon black pepper

In a heavy Dutch oven cook the bacon over medium low heat, in three batches, until browned and crispy; removing each batch and draining off the fat in between. Reserve 2 tablespoons fat from last batch.

Return Dutch oven to medium heat and add the onions. Cook, stirring often, until softened but not brown. Add the garlic and cook another couple minutes. Add all ingredients except the bacon. Bring to a boil; boil for 2 minutes.

Add the bacon and stir well. Reduce heat and simmer, uncovered, for 2 to 3 hours, stirring occasionally, until mixture is thick, sticky and syrupy. Spoon into freezer jars and store in the fridge, or freezer for long term storage.

Now for those of you who are curious about making your own home cured bacon, you can check out Marty's recipe by clicking that link above. I did a little searching online and found all kinds of recipes and smoking styles and cure recipes. I'm sure you'll find one you like or create your own!

**National Pork Board

Wednesday, September 23, 2015

A Peek Inside Old Mother Hubbard's Cupboard- Indian squash soup

Old Mother Hubbard has a cupboard full of Hubbard. Hubbard squash that is. If you have never seen one, they are GIANT things, my favorite variety being the big Blue Hubbard. The first time I saw one I was in awe of this gorgeous unique looking vegetable. There is an apple orchard not too far from the Little Lake House and it was on a tourism day for work that I visited, an they had a huge display of many different kinds of pumpkins, gourds and squash, but the big Blue Hubbard really stood out, and I had to have one.

A few smaller blue Hubbards among pumpkins and
other winter squash
Folks..........one squash is a lot. I spent the better part of an entire day cutting up, seeding, peeling, and cubing that monster. It had to be a good forty pounder. I ended up with over 20 quarts of canned squash cubes. Twenty quarts is a lot of squash to make other foods out of. I didn't just have the Hubbard- I'm not that smart. I left the orchard that day with the back of my SUV full of Hubbard, butternut, Celebration, turban-type, acorn, Delicata, pumpkins and of course, apples so I have tons to work with. Home canned squash is very tender and works best in recipes that call for a puree. Baked goods such as bread and cakes, pies, soups, puddings- all delicious options for using squash. We have been on a soup kick since embracing the home baked bread idea and, well, we have all that squash and hopefully we can use some of it before our upcoming move away from the lake. No one wants to pack, load, unload and unpack heavy quart jars of squash......

I think next to the pumpkins and other squash, you can
get an idea of the enormity of this Hubbard.
Besides making bread at home, learning new cuisines and food cultures has been a goal of mine, and especially exotic things like Indian flavors. I've stocked up on many new spices used in Indian cooking, and now want to try them out. So many incredible flavors make up any given Indian dish. Learning to make tandoori chicken was a crash course in spices. Lots of chilies are used in Indian cooking, from mild to mouth-scorching hot. Ajwain is a pungent seed that flavors stir fried vegetables wonderfully. Cardamom, peppercorns, cumin, celery seed, fenugreek leaves and seeds, mints, mustards, ginger, cloves, cinnamon- the list goes on and on. Some add a savory element, some add color, some heat, some an herbaceous quality. The sweetness of squash is the perfect background for creating an interesting mural of flavors.

In researching my Indian flavors I did come across a great blog featuring "How To Build an Indian Pantry". Click HERE to visit.

Now let's talk about spices. Indian spices are so perfect and beautiful on their own, combined in blends they take on a whole new dimension. Complexity, flavor, some with heat, some sweet, most are a true test for the palate- what exactly IS that in there?  This soup uses garam masala which is  a Northern Indian blend. Garam tells us it's a "hot" spice, but rather than hot pepper burn your face off heat, it refers to the intensity. Normally this mixture contains turmeric, white and black pepper, cloves, cinnamon, cardamom pods and cumin seeds,all ground together. You might find nutmeg, mace, star anise and allspice in there as well. In terms of Indian spices- the more the merrier! Toasting the spices really brings out the aromatic qualities and flavors in the spices.

Let's make some Indian Spiced Squash Soup. You will need-
  • 4 cups pureed cooked Hubbard or other winter squash
  • 1 medium onion, diced
  • 4 cloves garlic, minced
  • 1/4 cup olive oil
  • 3 tablespoons garam masala
  • 3/4 cup canned coconut milk (NOT cream of coconut)
  • 3 cups chicken broth
  • Herb Oil (recipe follows)
Heat the olive oil in a deep stockpot. Saute the onion until softened and translucent. Add the garlic and cook for 1-2 minutes. Don't let the garlic brown. Add the garam masala and stir, cooking another couple minutes to bring out the aromas of the spices.

Add the squash, coconut milk and broth to pot. Mix well. Cover and simmer for about an hour. Puree the finished soup with an immersion blender (or CAREFULLY in batches in blender). Serve drizzled with a little Herb Oil.

Herb Oil
  • 1/2 cup extra virgin olive oil
  • 1/3 cup parsley leaves
  • pinch of salt and pepper
Buzz in mini food processor til smooth. Use any leftovers in salad dressings, marinades or chimichurri.

This soup is perfect on a chilly, rainy fall day, and even better if you have a fresh from the oven loaf of crusty bread to go alongside. The Indian spices bring a warm feeling to the smooth creamy soup. Give this recipe a try!

Sunday, September 20, 2015

My First Food Truck- The Outside Scoop

Finally! I got to experience my first food truck! A while back I talked about food culture. Food trucks definitely have made an impact on food culture. Des Moines has a new and growing food truck scene and I am so glad to be here to experience it from the ground up. Lots of other cities have HUGE food truck followings. Austin, Portland, Los Angeles, New York- and loads of others- have swarms of fans who follow their favorite trucks on social media to see where they are setting up every day, and loads of people who see the trucks as a great way to try something new and totally different.

photo from The Outside Scoop's Facebook page
Like I said, Des Moines is a little bit late to the party, but our local trucks are more than making up for it. From the humble taco trucks to some pretty upscale menus and clever food carts it's a fast growing part of the culinary scene here. The city has been craving something new and food trucks are the answer. Lunchtime in downtown is  food truck heaven. Every day the different trucks post on social media where they plan on setting up for lunch, and later in the day as well- some as late as bar-closing time. Some trucks and food carts have "residencies" at local breweries and clubs, setting up in the parking lot and giving patrons some great food options. Works well for everyone- the trucks are making money, the bars don't have to have kitchens and the customers don't have to go somewhere else for something to eat. Just step outside.

I couldn't wait to get to the window- my first food truck!
(this is an unknown coworker)
Some of the big employers, including mine, often contract with food trucks to visit office complexes over the lunch hour as a convenient lunch option. The other day our company had a visit from The Outside Scoop. Based in Indianola, The Outside Scoop has a slogan- Small Batch....From Scratch, and their ice cream is beyond delicious. Owned by Joe Doering, this ice cream shop prides itself on it's small batch recipes that utilize as many locally sourced products as it can. The custom recipes include real chocolate, homemade baked goods, real fresh fruits, and no additives like emulsifiers or stabilizing ingredients. I can tell you, after tasting this ice cream personally, you can TELL this stuff is free of all those chemical ickies that are in the commercially made mass produced stuff in your grocer's freezer. Their menu is a rotating selection of about sixty flavors.

So The Outside Scoop has a storefront in Indianola, and at some point Joe decided to expand his venture and join the food truck scene. This was an awesome decision. The pretty pink Outside Scoop truck looks like it's got fudge sauce drizzling down, and pays homage to downtown Des Moines, known as The Loop, with "Scoopin' the Loop" proudly displayed on the truck. As I said, the truck paid a visit to our office the other day and it was a very very popular break spot for all of us. The sun was shining and it was a warm late summer day- perfect for an ice cream break. The truck had a great selection of flavors that day- vanilla bean, chocolate brownie, blueberry lemonade, pumpkin, salty caramel, strawberry sorbet, snickerdoodle and nutter butter. I could not resist the salty caramel, a fact that is well known by my friends and family. If it says salted caramel I am going to want it, and it was heavenly. So creamy, so smooth, good caramel flavor, not excessively sweet, and every once in a while I'd get a hint of salty flavor. I don't know they did it, but it was incredible. The ice cream definitely had that homemade consistency- I can't really describe what I mean by that, it was just icy and creamy and there was no "fatty" feeling in my mouth after eating it, like you get with some ice cream brands. I wish I could have tried more flavors that day but you can bet I'll be following these guys around.


Stay tuned for more food truck adventures as we visit all the Des Moines food trucks and food truck events.

Disclosure of Material Connection: I have not received any compensation for writing this post. I have no material connection to the brands, products, or services that I mentioned. I am disclosing this in accordance with the Federal Trade Commission's 16 CFR, Part 55: "Guides Concerning the Use of Endorsements and Testimonials in Advertising."

Sunday, September 13, 2015

Curing Olives at Home

I certainly meet all kinds of interesting people as an admin in a home canning and preserving group on Facebook. As much as I am there to teach I also learn from people all over the country- different regional foods, recipes and techniques, a lot of history about foods and preserving, and what's the newest in research and testing. David Burnette in a gentleman from Phoenix, who cures olives at home from trees on his property. Arizona's climate is perfect for olive trees, citrus, and other tropical plants that would certainly not survive a cold Iowa winter. The soil where he lives is alkaline and the olive trees' shallow root systems thrive. I'm a little bit envious actually. Everyone knows I am an olive freak and have been reading about curing olives and wishing I had a great source for shipping them to me.

David tells me olives are not palatable fresh off the tree, they must be cured. Unripe, or green, olives get a 3 to 4 week soak in water that is changed daily. This is called water curing and this process leaches out the chemical compound, called oleuropein, that gives fresh olives their bitterness. In order to completely get the compound out, and allow the water to fully penetrate the olive, you need to "crack" them with a mallet or wooden rolling pin, or cut several slits in them. Make sure when they are soaking that they are completely submerged.

You can see how David cut slits in the olives
the help leech the olives and get the brine in.
Once the soaking period is done, you're ready to make the brine that your olives will be stored in. A good basic recipe, enough for up to 10 pounds of olives is:

1 gallon cool water
1 1/2 cups pickling salt
2 cups vinegar

Place the olives in containers, such as jars, and cover with the brine. You can add flavorings to the brine, like strips of citrus peel, sprigs of fresh herbs, even garlic. Store the olives in the fridge and they last about a year.

You can also brine-cure olives in a similar process but you use a salt water brine of varying strengths during the process.

Ripe, or black, olives, can be oil cured, salt cured or brine cured, and also take several months to cure. To salt-cure ripe olives you want to have olives that are fully ripened. Wash and completely dry them. You need to weigh the olives so you can get the right amount of salt. You need 1 1/2 cups pickling salt for every two pounds of olives. You need a wooden crate- like a fruit crate- that you line with cheesecloth or old sheets. Mix the olives and salt together so they are completely coated with salt. Pour the olives and salt into the prepared crate and cover with a layer of salt, and cover with cheesecloth to keep any multi-legged friends out. You want to find a good safe COVERED spot outdoors to place the crate. Set it on top of bricks to get good air circulation all around. After the first week, dump all the olives into a container and mix them up and check for any bad ones. Then back into the crate they go. Repeat every week for a month, then taste an olive- if you like the flavor, you're done. Remove the olives from the salt and pack into glass jars with new salt for storage. You can also cover them with olive oil.


David also uses the leaves of the olive tree. Dried, they can be stored for a very long time and can be used to make teas which are loaded with healthful benefits. Incredibly, the very compound we want to remove from the olives is the compound that's so beneficial when made into a tea. Olive leaf tea is known to have anti-inflammatory and  antioxidant properties, help reduce bad cholesterol and high blood pressure. Studies have also shown a link between these compounds and fighting cancer and diabetes, Alzheimer's, arthritis, heart disease and stroke. 

So if you think you don't like olives...... maybe it's time to take another look at these incredible little gems.

**All photos from David Burnette

Monday, August 31, 2015

Hatch Chilies- Put That In Your Sandwich And Stuff It

It's Hatch chili time again. Last year I roasted them, peeled them and made salsa. This year I want to do something different that really puts the pepper right out there to enjoy. I heard the Hatches were back in the big grocery stores so I went on a quest to find them. I struck out at the first store, where I had got them last year. Darnit. I was afraid I might have waited a couple days too long and was going to miss out. A quick plea to my friends on social media connected me with the right locations and Hatch chilies were acquired. Whew!


I'm not just playing with these guys though. I stopped at the local farmers market a couple days ago and snagged a nice bag full of gorgeous hot banana peppers- some yellow, some red. I love these guys! I have some great memories of banana peppers- my dad always grew them in the garden, my mom always made fried peppers and onions with dinner in the summer, and from my waaaay back years I remember getting a nice butt-paddling after overhearing my dad call the peppers in a neighbor's garden "bananas" so I went and picked them. All of them. Oops.

Of course no pepper experiment would be complete without America's favorite pepper- the jalapeno. To use them in this recipe I had to hunt down really good sized ones, and even at that, I'm going to tell you guys- don't bother with jalapenos. The banana peppers were thin and pliable and super easy to clean. Same with the Hatch chilies, but the jalapenos and their thick "meat" were really tough to get in there and get all the membrane out. If you REALLY must, they are delicious, but labor intensive. 

Growing up, one of Mom's summer specialties was the good old stuffed bell pepper. She made a simple stuffing- hamburger, rice, onions, tomatoes, some diced pepper, seasonings, piled into bell peppers and draped with slices of cheese, then baked until the cheese was browned and delicious. Nothing gourmet, but just really good and homey. I loved them. So as an adult I find myself experimenting with not only new pepper types and heat levels, but often revisiting those classic dishes and recipes and making them more "me" and more my cooking style. 


If you're not an Iowan you will never understand the deep rooted love we have for our Graziano's* Italian sausage, although I'd be willing to bet you have your own local favorite. For us Grazi's is the Holy Grail of sausage, for pizza and pasta and for fantastic Italian sausage sandwiches. We love our Grazi's cooked, draped with marinara sauce and cheese and served on crusty bread. I'm swooning just thinking about it. Many people like to pile theirs with grilled onions and peppers. All these flavors seemed to be speaking to me as I pondered what to make with the peppers I have, and then it hit me. Why not take that sausage, add some breadcrumbs, cheese and a little of my homemade habanero pizza sauce, squish it until it's meatloafy (yes folks, that IS a professional culinary term, I promise) and stuff it in those peppers? Genius! I couldn't just do a stuffed pepper though- that's too obvious and every day, and I wanted to do something completely different and that, my friends, is how Stuffed Pepper Po Boys became a thing.


Simple ingredients, you choose the heat level you like in your sausage, in your sauce. I used homemade habanero pizza sauce, but marinara or regular pizza sauce works just fine. Add crushed red pepper to any part of this dish- the meat, the sauce, sprinkle it on top. Use hot Italian sausage or mild, it's totally up to you. It is going to be delicious.

Stuffed Pepper Po Boys

1 lb Italian sausage
3/4 cup dry breadcrumbs
1/2 cup marinara sauce
1 egg
1/4 cup minced onion
1 cup shredded mozzarella
10-16 peppers
additional marinara sauce
additional cheese
crusty baguette bread

Prepare the peppers- use a sharp knife and cut the stem end off. Carefully run the knife down the length of the pepper on ONLY one side- do not cut the pepper in half. Spread the pepper open and remove seeds and membrane and set aside. 


In a medium bowl combine the sausage, marinara sauce, egg, breadcrumbs and cheese. Mix well with your hands.


Again, spreading the peppers open with your fingers, stuff the meat mixture into the peppers, mounding slightly. Spoon a little additional marinara sauce on top of each pepper, spreading it out a bit. Place on a baking sheet and pop in a 375 degree oven for 35 minutes.


Remove from oven when done and turn on the broiler. Sprinkle each pepper liberally with shredded cheese. Place under the broiler until the cheese melts and starts to turn brown. Remove and let rest a few minutes.


Cut your baguette into sandwich size pieces and split in half. Spread with softened butter (garlic better is awesome) and broil until toasted and starting to brown. 

The stuffing stays so juicy- yum! You can serve with additional
sauce for dipping if you like, but it's not needed.
Top each baguette bottom with stuffed peppers to fill the sandwich. Top with the upper piece of bread and enjoy.

You can add any additional toppings you like, just like in the sub shop. I prefer to keep mine simple so I can enjoy the fresh peppers and that incredibly delicious Graziano's sausage. 


* I realized as I was writing this that we have not had an official Foodie Field Trip to Grazi's yet- so look for that in the very near future! Graziano's is an old old neighborhood grocery store with an incredible selection of Italian products, fresh meats, marinated olives, fresh baked breads and pasta.

Friday, August 28, 2015

Artisan Condiments- Spicy Tomato Jam

I don't normally share a whole lot of home canning recipes here, rather over on City Girl, Country Life, but this recipe just seemed to be more at home over here on RTK. So there. You don't have to freak out and think "What the ****!! I don't know how to can things!" You don't have to- you can freeze it as well. 

Fancy jams are another trendy food that gets labeled as "artisan" these days. I often think that term is overused but some foods, like homemade small batch jams, are probably deserving. Jams aren't just for breakfast anymore and that's where tomato jam finds it's unique little niche. Depending on your recipe it can be absolutely appropriate for the breakfast table, but a little switching up of flavors, spices and adding some heat and acidity and you've moved over into the savory condiment section. I call this my ketchup for grownups.

You might wonder what all the fuss is about. It's jam. Big deal. But it's much more than that. It's jam alright, but it's spicy and sweet and savory and it's delicious and the perfect thing for crowning a juicy burger or alongside a nice hunk of beef. Want a grilled cheese that's just a little more than sliced American and white bread? Break out the GOOD cheese, some crispy bacon or crispy prosciutto, a smear of tomato jam on crusty sourdough and grill that baby up. It makes meatloaf a little more special than gramma's drizzle of ketchup over the top, and it's REALLY GOOD. Really good. So good you'll find yourself never wanting ketchup ever ever again. That's just the BASIC recipe! This time we're rewriting a page from City Girl's Canning Cookbook and making it RTK Style.

This rich and gooey jam starts with tomatoes. Summertime in Iowa is without a doubt the best time to get tomatoes. If you grow your own- even better! This summer was horrible for my garden and I had zero tomatoes to speak of. Thankfully I have access to some great farmers markets and was able to get a nice 10 lbs or so of beautiful red ripe Romas. You can use any kind of tomato you like but Romas are known for their meaty texture and drier interior- so the jam doesn't have to cook quite as long as some of the juicier tomatoes do. Any color tomato works too. I love tomato jam made with orange or yellow tomatoes- it looks so beautiful in the jars. Prep was easy-I sat down with my tomatoes and halved them, removed the core, scooped out the seeds and diced them. I leave the skin on my tomatoes because it's too much work to remove them, I don't mind them in my food and they are extra fiber really, but you can blanch and remove the peel if you want to.

Dice them up and put them in a large bowl. Measure them as you go and you won't have to do it again later. This recipe relies on evaporation to thicken, not pectin, so the recipe is flexible. The amount of sugar depends on the amount of tomatoes and I just cut up tomatoes until I'd used them all.


We need some heat and spice in this jam. The original recipe calls for cayenne pepper, but we have all kinds of beautiful peppers here so a good handful of fresh kung pao chilies got chopped finely and added to the party. Also in the original recipe is shredded or grated fresh ginger. I just so happen to have all that crystallized ginger tucked away n the freezer, so I plucked out a few slices and minced them up. Cumin, cinnamon and allspice go in as well, and a twist on the plain old salt. Because this is used as a savory condiment, I like those savory notes to hit from all over, so instead of plain salt I used some Montreal Steak Seasoning. Love this stuff- I just keep it on the counter in a salt crock and use it on everything. 

Spicy Sweet Tomato Jam

10 lbs Roma tomatoes
sugar
3/4 cup bottled lemon juice*
6-8 fresh kung pao chilies**
2 tablespoons minced crystallized ginger
1 teaspoon ground cumin
3 teaspoons ground cinnamon
1 1/2 teaspoon allspice
1 tablespoon Montreal Steak Seasoning
vinegar of choice, if needed

*Always use bottled lemon juice because it has a stable acidity level
**If you don't have kung pao chilies, use cayenne or whatever you have on hand, to taste. You can use fresh or dried and ground. I would start with 1/2 teaspoon ground cayenne and taste- add more if desired.

Peel tomatoes if desired. Halve; remove cores and seeds and dice. Place in large stockpot, measuring as you go. For every 3 cups tomatoes, add one cup sugar. I ended up with about 16 cups of tomatoes and used 5 cups of sugar. Stir to mix. Add the remaining ingredients. Bring to a boil; reduce heat and simmer until mixture is very thick, reduced, and mounds when spooned out. Be sure to taste the jam at least twice. You want to adjust for heat, and if the jam is too sweet, add a splash or so of an additional acid- balsamic vinegar or rice wine vinegar are great. Make sure you do this while still cooking down so it maintains the thickness.

The tomatoes start out bright red.......
Prepare a boiling water bath canner and jars (pint or half pint), or freezer containers. Spoon hot jam into jars, fix lids and rings and process in boiling water bath for 15 minutes; or spoon into freezer containers. Allow to cool slightly, then freeze.

Look at all the deep caramelization going on there.
Now this jam can take a loooooong time to thicken. I usually do it in the crock pot with the lid off. I can let it go overnight and in the morning be ready to go into jars and there is almost zero chance of scorching. Don't get discouraged if you go to give it a stir and it seems too watery- I promise, it WILL evaporate and thicken.

A couple notes about canning and food safety: 

Home canned foods can be amazing and wonderful and unlike any other food in the grocery store, but they can also be deadly. Be sure to practice safe food handling when canning- ALWAYS use a boiling water bath for high acid foods or a pressure canner for low acid food. NEVER place hot food in jars, invert them, and let them seal without heat processing. 

Along those same lines, it's very tempting to add a lot of extras to home canned foods to customize them. Unless you are a microbiologist or have a very in depth knowledge of home canning safety- DON'T. Stick with tested recipes. This recipe is only different from a USDA tested recipe because of the change in spices, which do not affect acidity. Never add things like onions or garlic as they can upset the pH and make the recipe unsafe and allow botulism to grow in the sealed jars.


Pay attention to your altitude. It affects heat and processing time. Always adjust for your altitude.

NOTE: This recipe has not been tested by the NCHFP. If you are not comfortable canning untested recipes, please do not use this one. For home canning information, visit the NCHFP website.