Sunday, February 28, 2016

Crusty Dutch Oven Bread

A lot of my friends thought I nuts for splashing out almost $300 for a Le Creuset Dutch Oven. I knew from the start this would be a lifelong investment piece and not a one-use item. I have already gotten more than my money's worth of use out of it just in all the roasting I have done. But the beauty of a piece like this is not just the beautiful seafoam green colored enamel on the outside, it's the versatility you have on the inside!


Now that summer is in the rearview mirror I like to get back to baking, and I have promised The Chef that I will bake more homemade bread, so after digging through loads of cookbooks from my collection (I should write a post just about THAT one of these days) and browsing bread recipes online I have discovered that bread bakers all over are using those Dutch ovens to bake amazing crusty artisan loaves of beautiful bread. I can do this! 

I have lots of options when it comes to utensils for bread baking. Stoneware pans, metal and glass loaf pans, metal and glass bowls, the pizza stone for foccacia and flatbreads, even a cast iron skillet. I guess it's just natural that I should look at the Dutch oven as well. I love the look of round loaves of bread. I've shared bread recipes before that were round loaves. They remind me of old European bakeries, with the neat slashes on the top and dusting of flour that you often see. Instead of a picture-perfect loaf pan-shaped loaf you get a free-form loaf that's one of a kind with those beautiful imperfections and super crunchy crust. 


Today we are going to make a simple white crusty bread. It's a soft no-knead dough made with regular flour, so you don't have to hunt down fancy flours, grains or anything you probably don't already have on hand, except maybe yeast. I have made this using whole wheat flour before and found it just didn't rise well and seemed heavy like a quick bread- not what I wanted at all.  We use a lot of yeast at our house so we always keep some around, and store it in the fridge so it stays fresher. This dough has no sugar or honey either, so it's a slow-riser, which is perfectly fine- mix up your dough in the morning and let it sit and proof for at least 8 hours before you bake it. You don't have to punch it down or do anything to it so you can make it before you go to work, and bake when you get home. No more excuses for not making fresh, homemade bread!


Let's get started on this super easy bread. You will need-
  • 3 cups all purpose flour
  • 2 teaspoons salt- kosher or sea salt is best
  • 1 teaspoon yeast
  • 1 1/2 cups warm water- about 105-115 degrees
In a great big bowl, stir together the flour, salt and yeast. I like to use a whisk instead of sifting- really gets things mixed together and keeps it light and fluffy not packed down.


Make a well in the middle and add all of the water. Mix it with a wooden spoon until a soft dough forms, but don't go crazy mixing it. You will have a dense, tough bread if you over-mix the dough.


Cover your bowl tightly with plastic wrap and leave it sit at room temperature for at least 8 hours, and as long as 24. The dough will rise in the bowl and look bubbly and weird like a science project. I like that brand of plastic wrap that is kinda sticky and seals itself to the bowl rim but if I am out of that I'll even put a plastic grocery bag over the top of my bowl- works great! 


When it's time to bake the bread, turn the oven to 450 degrees. Once the oven is at temp, place the Dutch oven in the oven. Don't worry, your Dutch oven can take it- they are meant for this kind of thing. Let the Dutch oven heat in the oven for thirty minutes.

Turn the dough out onto a well-floured board or table or even the counter top. Flour your hands and form the dough into a ball. I place the inverted bowl over the dough to cover it and let it rest while my Dutch oven preheats.

It doesn't look too impressive when it first goes in the super hot pot.
When the Dutch oven is ready, carefully place the dough in the pot- be careful! It is extremely hot! My Dutch oven is enamel-coated so I don't have to worry about sticking but if you're using some other type of pan or bowl you can place the dough on parchment paper to prevent sticking. Replace the cover and return to the oven. Bake for 30 minutes. Remove cover and continue baking 10-15 minutes until the loaf is nicely browned and sounds hollow when you tap on it.

After the first 30 minutes. This reminds me of the par-baked
bread you can buy at the grocery store.
Carefully remove from the hot pot and allow to cool on a rack a little bit before slicing. This helps the bread stabilize itself, the steam eases and the bread won't collapse.

Super crispy, super crunchy and perfectly browned!!
If you're like me, you just fell in love with this bread and you'll be playing with flavors and planning to make it again. It works great with things like dried herbs, chopped sun dried tomato bits, garlic, crumbled cooked bacon, even Parmesan cheese. Leftover bread stays fresh for a day or two. Unlike grocery store bread there are no preservatives so it does get moldy around the third or fourth day, if it lasts that long! It also makes excellent croutons the next day- just toss with olive oil or melted butter and toast in a hot skillet until golden brown all over and crispy. I think next time I'll grab some Italian meats, cheeses and tapenade and make my round bread into a muffaletta for football day. Stop back by and share how you enjoyed your round artisan bread! I'd love to hear about it!

Tuesday, February 23, 2016

Because Orzo is My Obsession

Ahhhhh orzo. The little bitty rice shaped pasta that I love so much. It's soooooo cute and so versatile. I like to use it as often as I can, and lately, it hasn't been all that often. But I've been in a creative kind of mood in the kitchen lately and leaning towards regional Italian dishes. Not your every day spaghetti and meatballs stuff either. Different pastas, sauces, using more vegetables, the sort of things I might find if I were shopping at a market in Italy.....

I miss shopping in Europe!
I've made a similar dish before with chicken sausage and cannellini beans and it was delicious. So much so that my fiance chef "stole" it from me and featured it as a special in the restaurant and the entree during a beer pairing meal. This time I'm going for a casserole type dish that's fresher and lighter than lasagna, and much easier to throw together. I am sauteing chicken for this dish but I could just as easily see this as a great way to shrimp. But then again, I've never met a shrimp I didn't like! 

Imagine shopping at this awesome meat market!
This dish comes together very quickly, with the chicken being the most labor intensive part, and honestly, it's not all that taxing to cut up and saute some chicken cubes or slices. I like slices, like you'd use in a stir fry, but that's just me. Let's get working on this easy to put together casserole style dish with a Tuscan twist-

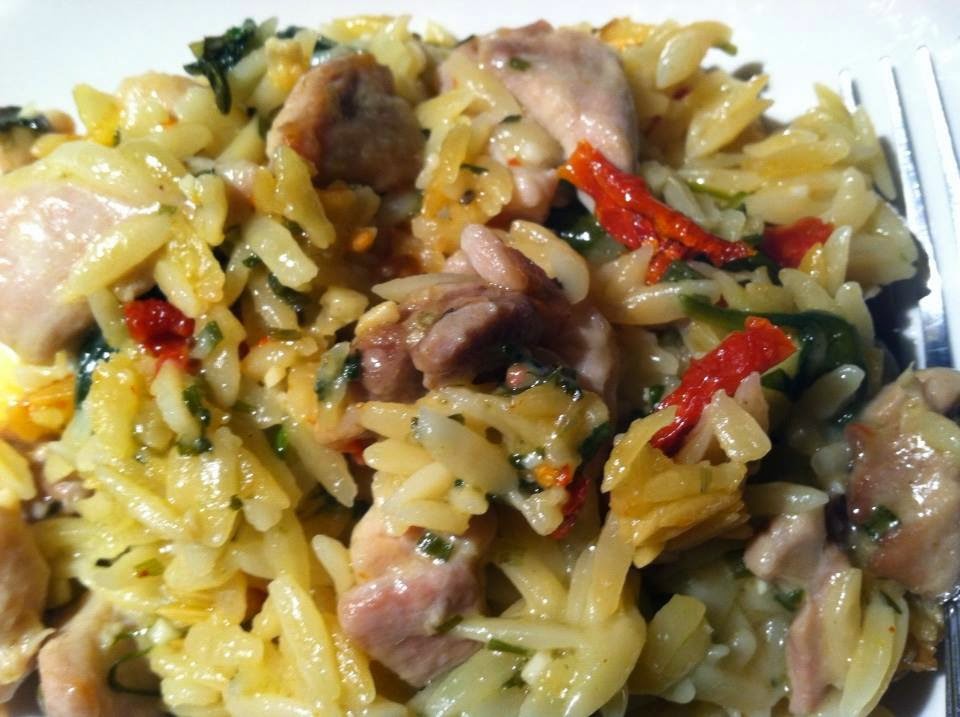
Tuscan Baked Chicken and Orzo

1 cup orzo pasta
1 pound boneless chicken
salt and pepper
1 tablespoon olive oil
3 tablespoons butter
4 or 5 green onions, thinly sliced
4 cloves garlic, chopped
1 1/2 cups chicken broth (plus more if needed)
1/2 cup freshly grated Parmesan cheese
handful sun dried tomatoes, chopped
couple handfuls baby spinach (stems removed)

Cut chicken into bite-size pieces. I made the "budget friendly" decision to buy bone-in skin-on chicken thighs and spent more time prepping the chicken than the entire rest of the recipe takes to prepare. Not doing that again! In large skillet heat the olive oil and butter until sizzling. Add chicken and cook, stirring often, until browned and mostly cooked. Remove chicken to bowl and set aside. Melt additional 3 tb butter in pan, add onion and garlic and cook briefly until softened. Add chicken stock to skillet, stirring and scraping up the tasty bits on the bottom. Add Parmesan cheese, tomatoes, spinach, orzo and chicken. Spoon into 11x7 baking dish. Bake in 350 degree oven for about 45 minutes to an hour, until heated and bubbly and orzo is cooked. You may need to add extra broth if the orzo absorbs too much- check about halfway through cooking time. This recipe makes the perfect amount for dinner for two but is easily doubled for a family. You may need to adjust the baking time. 


Note- You can use leftover cooked chicken also, but you would still want to brown it in the oil and butter- it really brings some good flavor to the dish.


So now that dinner is on the table, we need to think about sides. I think this dish pairs perfectly with a plate of sliced fresh tomatoes. No adornments or fancy dressings- maybe a little drizzle of balsamic vinegar and a very small sprinkle of chiffonade of basil. A pinch of sea salt. Some good rustic crusty bread. A nice glass of crisp Pinot Grigio. 


Close your eyes and envision that little village in Tuscany, that sidewalk bistro.......


****Pics from Italy courtesy of Deberah Tedesco-Roberts. She was gracious enough to share pictures from her recent vacation. Yes, I am jealous.

Sunday, February 21, 2016

Not My Gramma's Cornmeal Mush

Today was another Cooking Saturday with my friend Katie. Cheese stuffed meatballs were on the agenda, and they turned out delicious. Like we often do, we grocery shopped before cooking so we'd have everything we need for the project. Once again I find myself leisurely strolling the aisles at one of the great big grocery stores in the city. So much inspiration all around me. The produce section was full of fun things today. Carambola, big beautiful red bell peppers and baby bananas ended up in my cart, along with blackberries, cucumber, carrots, onions, and some beautiful asparagus. I was proud of myself for not blowing the entire grocery budget right then and there- the oyster mushrooms, dragon fruit, papayas, mangoes and all kinds of different varieties of apples were calling my name.


In the bakery they were having a buy one get one free specials and I succumbed to the temptation to stock up on baguettes. Some made it to the freezer and one is waiting for me to break it open and slather on some butter. The olive bar is a frequent trap and it caught me again today. Peppadews and a mixture of lovely green and black olives made a great snack while we were cooking meatballs. Katie had never tried peppadews and I do believe she is a new fan. 

As I walked up and down the aisles I made a mental list of recipes I was wanting to try and ingredients I would need but don't have, like fish sauce and oyster sauce, so when I reached those shelves I added a small bottle of each to my selections. Baby clams for the Chef (he is a big lover of red clam sauce) and more cookie sprinkles for my collection added to the eclectic assortment of groceries in my cart. I also grabbed a couple of the ingredients we needed for our meatballs and finished up my shopping and headed back to Katie's to cook and relax. 

Our Saturday ritual is a godsend for both of us. Being able to connect with a woman who shares so many commonalities with me- first and foremost being a night shift Chef wife- we identify with each other's struggles like no friend I have ever had before. The restaurant industry can be very hard on families and being able to talk to someone who has the same frustrations that I have makes it so much easier to deal with the "bad" things- like the weekend nights that he works and I don't, and holidays like Valentine's Day- guess who will be working and guess who will not be going out for a romantic dinner. It's funny to talk about the eccentricities of our partners and how similar the guys are, even though they have not yet met each other, they appear to be cut from the same cloth.

Since I will not be going out for a romantic dinner on Valentine's Day I decided to cook something really lush for dinner. Braising beef with vegetables and a rich stock and tomato based sauce were the perfect way to warm up on this cold and snowy Valentine's Day. It was also a chance for me to play a little with polenta instead of the typical potatoes. Since I also snagged a bottle of my favorite Riesling at the store, it was a pretty nice dinner for one. Polenta is one of those easy to make dishes that's often overlooked as fussy and difficult to master- which is so not true. You also don't need to buy anything special. It's cornmeal. That's it. Just like the old fashioned cornmeal mush your grandparents probably made for breakfast but this version is made creamy with whole milk, butter, and cheddar cheese. It's so perfect with a rich brown gravy and hearty braised beef cubes. Let's make some!

Cheesy Polenta

1 cup water
1 cup whole milk
1/2 cup cornmeal
salt. pepper
1/2 cup shredded cheddar cheese
2 tb butter

In a saucepan  over medium high heat bring the milk and water to a boil. Slowly add the cornmeal, whisking the entire time to prevent lumps. 


Reduce heat to low and cook about 15-20 minutes until creamy and tender. Remove from heat. Season with salt and pepper and stir in cheese and butter.


What to serve with polenta? something rich and beefy with dark gravy

Braised Beef Tips with Mushrooms

2 lb boneless beef roast or steak
salt and pepper
4 oz fresh mushrooms
4 slices bacon
1 medium onion, cut into chunks
5 cloves fresh garlic, minced
2 carrots, peeled and sliced
2 tablespoons tomato paste*
2 bay leaves
1/2 teaspoon rosemary, crushed
flour
3 cups beef stock (or a mix of stock with wine or beer if you prefer)
cornstarch
cooking oil

*As an option to using tomato paste you can use chopped sun dried tomatoes as well. They add the same depth of flavor.

Wipe the mushrooms clean with a damp paper towel. Trim the ends off the stem and halve the mushrooms. Set aside.

Cut the beef into large cubes, trimming off fat. Season meat with salt and pepper. Dredge in flour. Cut the bacon into 1/2 ich pieces. In a Dutch oven or braiser, cook the bacon until crisp and browned. Remove to a paper towel to drain and set aside. Leave the bacon fat in the pot. Begin searing the beef cubes being careful not to crowd in the pan. Remove beef cubes to a plate as they brown and add more to the pot. 

After the beef is browned add another tablespoon of oil to the pot. Add the onion and carrots, cook and stir for a couple minutes, then add the garlic and herbs. Cook and stir for a minute. Add the tomato paste and stir well. Add the beef broth and bring to boil, scraping up the browned bits from the bottom of the pot. Return the beef to the pot along with the mushrooms and bacon. Cover and reduce heat to low, cook 2-3 hours, until meat is tender.


Remove meat and vegetables from the cooking liquid using a slotted spoon. Make a small amount of cornstarch slurry to thicken the gravy. Return the meat and veg to the sauce. Serve over the polenta.

Friday, February 19, 2016

Ghosts of Recipe Contests Past

I recently entered a recipe contest. I did not win. It wasn't really about the food, it was about votes, and who has the most friends, and the most devices so they can vote multiple times. Not really fair. It was a popularity contest, and my delicate seafood pasta dish was handed a severe beating by a strawberry milkshake. Go figure.

Anyway, to ease my wounded feelings and remind myself that even though I was unable to come up with one thousand plus votes, I still am a very very good cook. So I dug out my cookbooks. MY cookbooks, the ones I made several years ago when I was nuts about scrapbooking and had loads and loads of supplies and a room devoted JUST to crafts. As I flipped through the pages my battered ego began to heal, remembering the delicious venison recipes, the incredible desserts, the "fat ass potatoes" my family loves so much. 

And then I turned to that magical page (two of them actually). So long ago when I was little more than a newlywed with a baby and practically NO cooking experience I took a chance at a recipe contest while living in Fort Worth, Texas. I entered two recipes- one dessert, Ballerina Birthday Cake (and no, it didn't have a doll torso sticking out of it, it was a peachy, pretty delight trimmed in ribbon and tiger lilies) and one salad, Chicken Salad Vinaigrette, which was served in a very unusual way. 

Imagine my surprise when someone called me from the paper to tell me that I had actually WON! Me- the young girl who barely made more than Stouffers lasagna and Banquet frozen fried chicken- had won a recipe contest!! You have to understand here, as a girl growing up I NEVER had to cook a meal at home. My mom always cooked dinner, my dad always cooked breakfast. As a new wife we ate Stouffers, take out and a lot of frozen pizza. But then I began collecting cookbooks. I'd read them just like other people read novels. I became interested, and experimented. A lot. It wasn't always pretty and the results weren't always great but eventually I developed into quite a good home cook. As my cookbook collection grew, so did my desire to try new and exotic foods and techniques- and the rest, as they say, is history!

Anyway, the newspaper called to tell me I had won. I needed to come downtown and have my picture taken and be interviewed for their special Cookbook Edition (yes, it is still part of my collection) and bring my completed dish as well. I was TERRIFIED! 20 years old and had to go all the way downtown in a strange city with a baby and a dish and keep myself composed! Well, I survived, and now I look back on that day with pride and a smile. I may never win another contest but at least have that one title, and that makes me pretty happy. So let me share my recipe with you. If I were making this TODAY I would have a few more salad components in there- chopped Peppadews, maybe some green olives or capers, halved grape tomatoes, but this is the original, as it appeared in the November 9, 1983 edition of the Forth Worth Star Telegram


Chicken Salad Vinaigrette

2 cups cubed cooked chicken (breast preferred)
1/2 cup sliced ripe olives
1 cup salad oil
2 teaspoons chopped fresh chives
dash salt, pepper
small red onion, sliced and separated into rings
2/3 cup lemon juice
1 teaspoon dill
4 large cream puffs, split and dry
lettuce leaves and garnishes as desired.

Toss chicken, onion, olives together, chill. Combine dressing ingredients in a jar, shake to mix. Chill. Arrange lettuce leaves on four salad plates. Divide chicken among puffs, place on plates. Fix garnishes and dress salads according to taste. Service immediately.

Cream Puffs (sorry...but they spelled it wrong in the paper and I can't do that!!)

1/4 cup butter
1/2 cup water
1/2 cup flour
2 eggs
1 teaspoon dill
sesame seeds

Melt butter with water in pan, add flour and dill. Stir until dough forms a ball. Remove from heat, let stand five minutes. Add eggs one at a time, beating well after each. Drop in four mounds on greased baking sheet. Sprinkle with sesame seeds. Bake at 400 degrees until golden. Cut small hole in top, return to oven to dry (with oven off). Cool thoroughly.


Looking back on this recipe I see the beginnings of an imagination. I loved cooking back then as much as I do now. My budget was EXTREMELY limited but I managed to make some pretty spectacular dinners with what I had to work with. Do you know how EASY it is to make a "chocolate mousse" with Jello instant pudding, milk and some Cool Whip? Or a stroganoff-type crepe filling from hamburger and cream of something soup?  I no longer cook like that with convenience foods but I sure have fond memories of learning and growing, and reading those millions of cookbooks.........

Wednesday, February 17, 2016

Mini Cast Iron and Baby Dutch Babies

Ever since I've been obsessed with cast iron, I have been obsessed with MINI cast iron. Mini skillets and single serve pans caught my eye immediately and I haven't been able to say no to a cute little pan since the first time I laid eyes on one. The obsession has reached epic proportions since finding cast iron cookie kits and brownie kits in some of the stores. Not only do those come with a tiny skillet, they often are holiday themed, and the skillets are shaped like stars, pine trees and even hearts! I die!!


It took a long time for me to be converted to a cast iron fan. I always swore they were too much trouble. I didn't want to mess with seasoning and then the fussy cleaning and reseasoning after you use them. I had a glass top stove and thought they were too heavy and would scratch the surface. I just didn't get it. Then one day I got my first skillet. It wasn't new. My sister gave me one of theirs. It had been handed down from her mother in law, and was well seasoned already and the perfect size for me to cook in.

The first burgers and steaks cooked in that skillet made me a convert. No skillet I have ever owned gave such a perfect sear and beautiful crust on the meat. I still was a little whiny about the after care but after a few times, it became no big deal. Now I find myself seeking out recipes to use that skillet- baked recipes like pot pies, anything that needs a good hot sear like steaks and roasts, well, pretty much anything. I made Alton Brown's chicken fried steak in that skillet and it was as close to  heaven as a food can be. I am positive the skillet made the difference.


Fresh berries and sliced bananas are delicious with the
pancakes, topped with a little syrup.
Recently I became the happy owner of several mini cast iron skillets. Once the initial child-on-Christmas-morning  excitement wore off I set to thinking about what I was going to make in them. Individual dinners were an obvious choice, and I have a really great idea that I'll be sharing soon, but I wanted something I could make RIGHT NOW with ingredients I have in the kitchen right now without having to go to the store and get a bunch of stuff (did I say I am obsessed??). Most of the time when I don't have anything planned for dinner and I don't want to head to the store, that means we'll be having breakfast for dinner, and like a bolt of lightning it hit me- oven pancakes! Oven pancakes, often called Dutch babies, remind me of popovers- a somewhat thin batter poured into the hot pan with lots of sizzling butter, so tender inside and crispy on the edges. Cast iron is the perfect vehicle for a dish like that, so let's make some.

Baby Dutch Babies
1/4 cup butter
3 large eggs
3/4 cup half and half
3/4 cup flour
1 tablespoon sugar

Divide the butter between two mini cast iron skillets. Place in a 425 degree oven while mixing the batter.


In a mixing bowl, beat the eggs with a whisk. Add the half and half, the flour and the sugar and whisk until no large lumps remain- you want the batter to be fairly smooth without overmixing.


Flavor tip- You can add spices or extracts to the batter to enhance the flavor. I like adding a splash of vanilla or some lemon zest, if I have a lemon on hand.


Remove the skillets from the oven and pour the batter into the hot melted butter. 


Return to the oven and bake until the edges are puffed and golden brown, about 25 minutes. Serve with additional butter, syrup and fresh berries.


This is a fantastic weekend breakfast dish, and allows you to be a little lazy while baking it. Unlike regular pancakes you don't have to stand in front of the stove flipping, the oven does all the work while you browse through the newspaper. I am a big fan of breakfast for dinner and love changing this recipe up by adding cut up cooked breakfast sausage to the pan before adding the batter, or serving lots of crispy bacon on the side. Fresh berries and syrup are a must, and fruity syrups are even better. If you are serving kids just remember the skillets are HOT and remind the kids to be very careful.


Wondering how the cast iron worked as a non-stick surface for making an oven pancake? Here is the pan immediately after sliding out the Dutch baby, see for yourself!

Tuesday, February 16, 2016

My Night Out On The Town With My Grudge Monster

I can hear you all asking "Grudge Monster?.......what the heck is she talking about?" It's a long story. My daughter Laura, who you have heard about on the blog a couple times, is of mixed ethnicity. Being part Korean she likes to embrace her Asian heritage. When the movie The Grudge hit the theater Laura became a master at recreating that bizarre noise the Grudge "monster"makes, and there were times the monster looked oddly like her......so......nickname was created and the rest is history. What does that have to do with my story? Absolutely nothing. It's just who we are.

Surely you see the resemblance......
So anyway, a few days ago my phone ran. A quick glance showed Grudge Monster was calling me so I knew something fun was in the works. She invited me to attend the Des Moines CityView Best Of Awards and dinner before the show. Yay!!! Hanging out with Laurie is always a good time, getting to me interesting restaurant people and enjoying fun and exciting events. This was no exception.  

Grudge Monster, with Chef Tom McKern from Zombie Burger
Before the awards show we went to one of Des Moines' most popular and successful restaurants, Centro. Centro is also a George Formaro restaurant and, well, I already knew I'd love it even before the first bite. George knows his stuff. For an appetizer we had fried Brussels sprouts with truffle aioli. Holy buckets. If you haven't tried fried Brussels sprouts you are missing out! Some of the leaves come off and get super crispy like chips, while the halved sprouts stay crisp tender and don't have that stinky boiled smell. I want to make this at home!


Laurie chose the ricotta gnocchi for her entree. The little pasta pillows were airy and soft and one of the most delicious things I have ever tasted in my entire life. Tossed in a spicy red sauce they were such a fantastic and different pasta option. My dinner was the Chicken Francese. Two perfectly breaded and sauteed chicken breasts were stacked on top of perfectly cooked fettuccine and draped in a lemony sauce with fresh herbs. The chicken as tender and juicy, crispy on the edges, with the most delicious sauce. We finished dinner with an Italian hazelnut pudding that was so creamy, delicious and surprisingly light- the perfect finish to our dinner. In case you're wondering where the food pics are, I did not take pictures of our dishes. I was there to have some daughter/mom time and enjoy Laurie's company so pictures were not in the plan.


After dinner we headed over to Beer Can Alley (now there is something I never thought I'd actually say..... with BCA being a country bar) for the CityView Best Of Awards. CityView is a local magazine that has an annual survey of everything you ca think of- best burger, best spa, best dog groomer, best margarita, best plastic surgeon- seriously Best Everything Under The Sun. With all of George's businesses nominated in many many categories I knew there would be some celebrating going on. Laurie's restaurant, Malo, also owned by George, was nominated for several categories including Best Taco and Best Brunch. We arrive at the bar and join George and his wife Sheila Formaro, members of their family, and several other friends and colleagues from Gateway Market and Zombie Burger. 

Yes....we had the Proud Mama Needs A Photo Moment
Watching the crowd I got the who's who in the local restaurant scene. New restaurant owners like the two guys who own Lurra Cocina. Local chefs like Tom McKern from Zombie Burger. Local television personalities like Lou Sipolt and Cynthia Fodor. Lots and lots of local restaurant people.


Needless to say George cleaned up at the awards- many Best Of categories were awarded to George and his restaurants. Malo snagged Runner Up in several categories as well. 

Sunday, February 14, 2016

Let It Snow, I'm Making Soup

I have always been a winter lover. Snow bunny. Ice queen. Call me whatever you like I have always been in love with the winter season. Maybe it's in my DNA, being a Minnesota girl by birth. Every year I looked forward to that first snow, the first time I get to shovel, and hoping and praying for a BIG snowstorm and a snow day. A lot of my friends called me crazy for shoveling snow. I have never even considered owning a snowblower, instead preferring the quiet solitude of time spent outside with the newly fallen snow and my shovel. Not a sound around me, just the crystal white sparkling snow and peace and quiet. Now that I'm older I don't get to shovel like that anymore, and while I still love the beautiful snowfall, the cold weather is a little harder to enjoy.

These days instead of bundling up in a heavy coat, boots, gloves and hat and heading out into the cold, I like snuggling up with a blanket and a warm cat, throwing the curtains wide open and watching the wind whip the flakes of frozen beauty all around. These days it's The Chef who is out there manning the shovel and I concentrate on cooking up some of my favorite winter foods.


Winter foods.....what a wonderful category of recipes. Stews, baked pastas, roasts. I don't know about you, but I tend to think of soup as a winter food. There is something so warming and comforting about a big bowl of chili, or chicken noodle soup, or beef and vegetable soup. Homemade bread baking away while the soup simmers, warming the home and filling the air with amazing scents. It's my favorite time of year. 

Ok, so let's talk about this soup for a minute. It's easy, and I mean kindergarten easy. The hardest skill needed is the ability to crumble up and cook some hamburger. The rest takes care of itself. Probably the most bizarre part of this recipe is in the ingredients- I actually used fake cheese. You know what fake cheese is- it's a weird yellow rubbery loaf of cheese flavored....something, and normally I am a cheese snob extraordinaire, but in this case I needed something that would melt easily and not break down. So the old bechamel and cheddar cheese just wouldn't do it. I also cheated with store bought shredded frozen hash browns and packaged chicken broth. Sometimes, especially work days, a girl just has to cheat, and that's perfectly ok!


Easy Cheeseburger Soup

1 pound hamburger
1 small onion, diced
3 cloves garlic, diced
2 tablespoons Worcestershire sauce
small handfull fresh parsley, chopped
32 oz. carton chicken broth
2 lb chunk Velveeta, cut up
1 bag frozen shredded hash browns
assorted toppings (see below)

Place the hamburger, onion and garlic in a stockpot. Cook until hamburger is cooked through and onions are softened. Drain off fat. Sprinkle the Worcestershire sauce over the meat.

Add the chicken broth, hash browns, and chopped parsley. Bring to boil. Reduce heat to low and add cheese. Simmer over low heat at least 45 minutes. 

This recipe is great in a crockpot too- just brown the meat, and add everything but the toppings. Cook over low heat about 8 hours.

What to top this creamy yummy soup with? Think cheeseburgers! Crumble some crisply cooked bacon over each serving, or chopped pickles and fresh onions. Oyster crackers are great, croutons even better and so is a chunk of garlic toast. Chopped tomato is great too, or a sprinkle of shredded cheese. A couple shakes of hot sauce kicks up the heat a bit.

Yes.........this soup is definitely going to be a regular in my "winter foods" lineup of dinners. Right after I finish watching him shovel........

A Peck of Pickled Shishito Peppers

Ok, well not quite a PECK but....... hey it's shishito season! What the heck is a shishito, you ask? It's a cute little pepper, Japanese in origin, the name compares the pepper to a lion, and some people think the end of the pepper resembles a lion's head- I didn't see it, but what do I know? 

Shishito peppers are bright green, crispy and glossy
If you haven't had a shishito pepper before you simply must seek them out and try them. They are curious little things. Bright green, thin skinned, crispy and amazingly NOT hot they are a super quick pepper to cook up- Pop them under the broiler for a quick minute, just to start to blister the skins, or grill them in a hot skillet, toss with seasonings and a little olive oil and serve just like that for a quick and easy snack. Thread them on skewers and grill for barbeque fun. Be brave and try them- they really are not a hot pepper.

I found them at Trader Joe's this time but I also see them in
the regular grocery store during shishito season.
With that being said, there is always an occasional rule breaker in the basket- and in this case every once in a while you will encounter a shishito that is a bit on the hot side. How does that happen? Pepper growers think it's caused by stresses to the parent plant, or excessively hot weather during fruiting. It's fine with me because I enjoy hot peppers, and especially in a quick pickle recipe, like we're doing today. 

Shishito Quick Pickles

1/2 pound fresh shishito peppers
1 teaspoon mustard seed (I went with brown seed)
3 cloves garlic
1 dried hot red pepper (or 1/2 teaspoon crushed red pepper)
1 teaspoon salt*
1/2 teaspoon freshly ground black pepper*
1 cup apple cider vinegar
1 1/3 cups water

* Instead of the salt and pepper I used a generous teaspoon of Montreal Steak seasoning- I keep the stuff in a ceramic pot on my stovetop and use it to season everything!

Wash and sort the peppers. Cut a slit on each side of the peppers (two slits). Pack the peppers into a clean quart jar. Canning jars work great, so do repurposed commercial jars, since this is a quick pickle ad will not be sealed and shelf stable. Just make sure the jar seals tightly.

Peel the garlic cloves and cut several slits in each clove. Pack into the jar with the peppers. Add the red pepper (I used a dried Red Flame chili), salt, black pepper and mustard seed to the jar.


In a small saucepan bring the water and vinegar to a boil. Pour over the peppers in the jar to cover. Seal the lid and give the jar a gently couple of shakes to distribute the seasonings and dissolve the salt. Allow the jar to rest at room temperature for a couple hours to cool, then pop in the fridge.


Sadly.......you have to wait a good two or three weeks before eating the peppers. It's difficult, but so worth the wait.

When making quick pickles you can be as creative as you want with the ingredients. Since we don't have to worry about shelf stability we can use any herbs we want, so let your tastebuds be your guide. I like to use all different kinds of dried hot peppers in pickles and chose a Red Flame chili for this batch because I wasn't looking for something super hot, just a tiny hint of heat. Pickled shishitos remind me so much of pepperoncini, like you see used in salads and they are absolutely wonderful drained, sliced and sprinkled over a pizza- they add a kick of pepper taste and keep their fresh crunch because they're not processed in a canning bath.

Wednesday, February 10, 2016

Artisan Baking- Herby Beer Bread

You cannot claim to be a baker if you cannot bake a decent loaf of bread. You just can't. But the world of bread is so much more than the sliced white sandwich bread we're all used to. Bread baking is a very diverse art form with a skill level for everyone. Today we are going to bake a truly delicious quick bread. I know, "artisan bread" sounds all snooty and high-falutin' and quick bread generally is not thought of as snooty- but believe me, play with the right ingredients and flavor combinations and that is artistry if you ask me.

Beer bread is one of the easiest breads to make- very basic ingredients can be transformed into a warm loaf of deliciousness in just about an hour. No special equipment needed, no expensive mixes required. Flour, baking soda, sugar and a beer. That's it. If you have self-rising flour it's even fewer ingredients! The best thing about beer bread is it's a blank canvas. You can go wild with your favorite flavors and make just about any kind of bread your heart desires. Since we grow so many herbs in our garden, it's so easy to pull a few off the shelf and come up with something to match the meal we're cooking.


Today's bread is going to be a delicious combination of sweet and savory. Sweet caramelized onions and garlic, savory Guinness Extra Stout and thyme will round out the flavors. So let's get to it-


Herby Beer Bread with Caramelized Onions and Garlic

3 c. self rising flour (or 3 cups regular flour and 3 tsp baking soda)
1 tsp salt
1/4 c. sugar
1/4 c Parmesan cheese
12 oz can or bottle of Guinness Extra Stout
1/4 c. melted butter (NOT margarine)
1 medium yellow onion, diced
4-5 cloves fresh garlic, minced
2 tb minced fresh thyme or 2 tsp dried thyme
olive oil, butter
1/4 cup additional butter, melted


Preheat oven to 350 degrees. Combine all dry ingredients in bowl. Set aside.

In medium skillet add a tablespoon of olive oil and a couple tablespoons of butter, when melted add onions. Cook and stir over medium low heat until thoroughly caramelized. Add garlic for the last 5 minutes or so, to just cook the rawness out. Don't let the garlic brown. Stir in thyme.

Slowly pour in beer. Mix just enough to moisten, don't overmix. Add most of the onion mixture. Spread batter into greased loaf pan. Spread the remaining onions over the batter. Pour melted butter over top.


Bake approximately 45 minutes to one hour. Let cool for a few minutes before removing from pan.


Beer bread is a quick bread, a lot like muffins, and is best served fresh from the oven, warm with loads of melty butter. Leftovers make good grilled sandwiches too. I hope you enjoy this version and are inspired to try your own combinations. This one had those super browned bits of onion on top-reminded me of onion buns. Yum!


Today we're bundled up in the house on The Chef's day off, watching movies while the oven warms the house and a big pot of yummy pasta sauce simmers away on the stove. We will be enjoying our warm bread with big bowls of rigatoni tossed with The Chef's delicious pasta sauce and venison- I can't think of a better way to stay warm on a cold winter evening.