Saturday, April 29, 2017

Jackfruit- finally!!

Holy cannoli I FINALLY got a jackfruit! Now, you're probably wondering why in the world I am this excited about a fruit, and for that matter who in the world gets that excited about a fruit? I get it, but folks, this is not just another kind of apple or berry I'm talking about- this is a JACKFRUIT. Time to let you in on a little secret- I watch Food Network (insert sarcasm, please). A lot. More than a lot. Probably the bulk of my television time is spent on Food Network programming, but that's ok, right? At any rate, I've seen this fruit on numerous cooking shows, usually in competition shows on which the idea is to stump the contestants because who in the world really knows what the heck to do with a jackfruit? Well, we are going to find out.

A couple months ago The Chef and I were browsing the local mid-size supermarket looking for inspiration. We were feeling a bit in a food rut. Whenever that happens we like to meander around the store and looks at food items we have not yet cooked with or haven't for a long time, or something from our childhood- like La Choy chow mein in a can. Don't laugh- a lot of people in our generation have fond memories of our mothers making this for dinner with those brown crunchy noodles and Minute Rice. We usually start in the produce section because it's right by the front doors of this particular store. On this occasion there was a large display of tropical fruits- rambutans, carambola, cherimoya, and things like that. Different kinds of papayas and mangoes. Baby red bananas. Lots of fun things including......... this monstrously gigantic kinda prickly and HUGELY heavy jackfruit. I immediately wanted to take it home with me but with a $40 pricetag that wasn't going to happen today so I sulked around the store the rest of the time and bemoaned my poor luck- having finally found a jackfruit but a limited budget.

Fast forward to now and I pop into Whole Foods, more for snooping around than for shopping, as we don't normally go there unless I'm looking for an unusual grain or type of rice, and lo and behold, right there, in the produce section (again the first department I wandered through) was once again the object of my intense obsession- the jackfruit, but this time it was not a $40 million pound globe of fruit to feed 50, it was cut up and sold by the slice. Jackpot! Now that my wish has been fulfilled my grandson Nathan and I are going to play with this fun fruit and learn a little about it at the same time.

Jackfruit, top, and durian, bottom. Photo from Wiki.
The first thing we noticed about our slice of jackfruit was the smell. I guess I should say fragrance or aroma because this thing smelled beautiful. So fruity and floral like pineapple and tropical flowers. A lot of people confuse this fruit with it's terribly stinky lookalike, the durian, but this jackfruit smells like heaven. I also read about a very sticky sap and was warned to oil my hands and utensils to prevent the sap from getting all over, as it's very hard to remove. That must happen more when you're cutting open a whole jackfruit because while we did oil our hands, we didn't encounter any sticky sap and didn't re-oil after handwashing.


The skin of the jackfruit is pretty thick and tough, but I was able to cut through it with no difficulty at all. The core was very pronounced and easy to remove. The fruit itself looks like little pods and each one contains a seed. Nathan and I learned that the jackfruit is actually just a giant flower with the petals on the inside and the fruit bulbs are flower petals- kind of cool to think about. There is a big seed in each bulb, about as big as an olive. We also learned that the seeds are also edible. The seeds smell like chocolate and if you dry them you can grind them as use them like cocoa. You can also boil the seeds or roast them, and they taste like water chestnuts. 

The funky stuff around the bulbs is also edible. We learned that it can also be cooked and shredded to use like meat- like in a pulled pork or pulled chicken sandwich, and that many vegan and vegetarian people do use the jackfruit as a meat replacement. Just imagine, a tree that can maybe eliminate starvation. We read that each jackfruit tree, which is the largest of all fruit-bearing trees, is capable of producing 100 to 200 fruits per year, and that each fruit can weigh up to 80 pounds. That is a lot of food!

Looks like chicken!

Our bulbs and our seeds.
What else did we learn about jackfruit? Lots! We learned where the trees grow- mostly Asian countries and South America where it doesn't get cold. They originated in rainforests. They cannot survive winter like we have here in Iowa. If you live in Florida and are very lucky- you might be able to grow a jackfruit tree. They are the national fruit of Bangladesh. Like the fruits we are used to eating in our part of the world, the jackfruit relies on bees to pollinate and produce fruits. We did collect 13 seeds, most of them are whole seeds and a couple were "nicked" by the knife. Nathan and I are going to try and sprout them and see if we can grow a jackfruit tree just for fun. We know it won't survive outside but we can grow an avocado pit into a nice house plant, so why not try this? I figure we'd also try the nicked seeds in case it makes it easier to germinate like some of the tough seeds require.


Our fruit bulbs went into a zip top bag and in the freezer so the next day we could make smoothies with them. It was very sweet and definitely had the mango and banana flavors. The next time we try jackfruit we will probably get a couple slices or maybe canned jackfruit and try THIS RECIPE for BBQ Pulled Jackfruit from the More Vegan Blog. A little bit of research online and we found all kinds of different dishes to use it in, both sweet and savory. We had fun and learned a lot about this weird fruit you don't see in Iowa very often. I wonder what weird food we will find next?


Disclosure of Material Connection: I have not received any compensation for writing this post. I have no material connection to the brands, products, or services that I mentioned. I am disclosing this in accordance with the Federal Trade Commission's 16 CFR, Part 55: "Guides Concerning the Use of Endorsements and Testimonials in Advertising."

Tuesday, April 25, 2017

The Chef's cooking duck breast!!

It's not very often The Chef and I get duck breasts to play with so you can imagine how excited I was when he decided he would be preparing duck breast for his Friday special. As you know, The Chef cooks at The Wine Experience, a locally owned restaurant and wine bar that is a small bistro-style restaurant tucked into a high end shopping mecca. Each Friday he prepares an off-menu special with seasonal, locally produced (when possible) ingredients that usually are purchased that same day. It's been a lot of fun for to watch him work on his meal plans, grocery lists and prep sheets. Sometimes we collaborate on an idea and bounce things around until he has exactly what he is looking for but he is the creative mind behind the weekly Friday special. Over the months he has worked there he has created some amazing and delicious dishes, every week it's a sell out. His past specials have included cioppino, Italian pasta dishes, and shrimp picatta. It's not uncommon for him to receive requests for his recipes, and he is usually happy to oblige.


Duck breast is something he is not normally excited to work with. Let's face it, there are a lot of steps involved when making duck breast. Scoring the skin is critical to rendering out all that crazy delicious duck fat. Salting the breasts and storing uncovered for 24 hours seasons the meat. Rendering the fat is a bit time consuming but it's absolutely essential. Not only does it make the duck breast completely delicious without being overly fatty, you get all that rendered golden goodness to save and use for cooking other dishes. You haven't lived until you have experienced duck frites! So, with that in mind, what's on the menu for Friday?

Pan Seared Duck Breast with Blueberry Champagne Sauce

Trio of Roasted Baby Potatoes

Green Beans Amandine

So to get everything ready for service, The Chef has to arrive at the restaurant several hours before service begins to start working on the duck. Like I said, he scored and seasoned the duck the night before and has had this in the cooler overnight. 


Scoring the skin is crucial. The melting fat escapes and
the skin doesn't curl up.
To properly render out the fat, place the duck breasts skin side down in a COLD skillet. Place the pan over medium heat and slowly allow the fat to melt and render out. Keep a bowl or jar handy to scoop that delicious fat into. You definitely want to save the fat. 


You can see the pattern of the scoring as the skin crisps
and just look at all that amazing and delicious duck fat!
When the skin is crispy and the fat is rendered out, remove the breasts from the pan and place on a sheet pan to cool.


Never crowd the breasts in the skillet or they will steam and never brown. You're looking for a light golden brown at this stage. Remember- this is restaurant cooking, not how you would prepare them at home. Once you've rendered the fat successfully, remove the breasts to a clean baking sheet. skin side down, and store in the cooler until time for service.

The sauce is also made ahead, using the skillets used to render the fat. Spoon out as much of the fat as you can, and deglaze the pan with an entire bottle of champagne. Bring to boil, scraping up the delicious fond from the bottom of the skillet. Reduce the champagne to about half. Add a little chicken broth, some chopped fresh thyme and fresh blueberries. Cook until the berries have burst and cooked through and the sauce is further reduced. Add a little orange zest if you like and thicken with a cornstarch slurry. Add more fresh blueberries at this stage so you will have plump whole berries in the sauce. Taste for seasoning and adjust. Keep the sauce warm.

When it's time for service you will want to start with a cold pan again. Place the duck breasts skin side down and cook until deep golden brown. Flip over and sear the underside for a couple minutes, then place on a sheet pan and pop in 375-400 degree oven until the internal temperature is 135 degrees for medium rare. Remove and let rest while you plate up the vegetables. Slice the breast diagonally into thick slices, arrange on the plate and spoon sauce over.

Beautiful! Beautiful and delicious. Duck breasts are a wonderful choice for entertaining. Now you might scoff at the idea of a medium rare to rare piece of "bird" meat, since we would never eat chicken or turkey this way. Duck is a whole different kind of meat. It more closely resembles beef that any poultry and has the best flavor and texture when treated like beef. Roast duck, however, is still roasted like chicken or turkey except you MUST prick the skin all over to release the fat as it roasts. It's all about the preparation. If you are not comfortable eating medium rare duck, stick with roasting. Duck is a rich meat with a lot of flavor, and makes all kinds of dishes interesting and delicious- duck tacos is a favorite of mine. Ducks harvested from the wild do have a slightly different taste and texture than commercially farmed ducks but both are very delicious and highly recommended.

Saturday, April 22, 2017

Foodie Field Trip- Small Town Iowa and the Kitchen Outlet Store

Springtime is springing all around Iowa so Katie, who I would describe as my little sister, suggested we go on a Saturday road trip to somewhere fun. Nothing we have to pack for, or overnight, just a short drive, some interesting sights to see, lunch in a new spot, and maybe a little shopping if we find anything cool. Our original plan called for a very early, up-with-the-chickens day, on the road by 6:30 and headed to Owatonna, Minnesota for some shopping at Cabela's, the outlet mall in Faribault, lunch at Nick's Pizza and then a leisurely drive home. Mother Nature did not agree and her plans for the day included severe thunderstorm watches and warnings, and not wanting to be hundreds of miles from home driving in tornado strength wind, we opted for something a little closer. 

We made our plans Friday night. We'll sleep in a little later and drive about 30 miles away to Ames and then Boone. Lots of things for both of us to discover in Ames, and Boone is home to a very well known bakery. Surely we would find antique shops and cute gift type stores and things like that along the way. We are both chefs' wives so we wanted to track down something good to eat for lunch along the way. Both Ames and Boone have lots of great foodie spots, like The Cafe and Hickory Park.

Our trip started out with a quick stop at a toy store so Katie could pick up her little boy's Easter gift. It just so happens that the toy store was pretty close to a new coffee and bagel shop we've both been wanting to try, 5 Borough Bagels, was right up the street. Every day we have seen them advertising very tempting coffee flavors and since we're both coffeeholics, that had to be the kickoff for our day. Katie got the Birthday Cake latte and I got the Scotcheroo. They were......ok. The coffee flavor was good, but the Birthday Cake latte was awfully sweet even though it's flavor did remind me of birthday cake.The Scotcheroo latte didn't really have that peanut butter/butterscotch flavor at all. It just tasted like a regular latte. Not overly sweet it was good, but not great, and came with a big pile of whipped cream on top, which is something I would rather leave off. Another drawback- the coffee only comes in a 16 oz size. No small, medium, large. No tall, grande or venti. Just one size. It was worth trying but since it's out of the way for most of my running around town, I don't know if I'll go back or not.

We hit the highway after the toy store and while chatting decided to it up and head east instead of north and check out the outlet mall in Williamsburg. Talk about happy happy happy- they have a kitchen outlet!! Foodie heaven! It's a good hour drive and by the time we got there we figured it would be best to feed our young traveling companion before hitting the shops so we headed into the town of Williamsburg, just south of Interstate 80. It's a cute little Iowa town, postcard perfect with a coffee and antique shop in an old Victorian house. Businesses such as banks, shops and restaurants circle to town square which is a grassy park. I'm so glad we visited when we did. The recent spring rains have changed the grass into a lush green carpet and spring flowers are blooming everywhere.


Just off the square is the Sundown Bar and Grill. After googling options in the area we decided to check out the place. Now, I have been to many many mom and pop small town eateries over the years and some are barely mediocre with a menu packed full of deep fried everything but that was not the case here. There were a number of fried things, like onions rings, breaded mushrooms and cheesesticks and fried pickles, but they also offered a nice selection of hand pattied burgers, breaded or grilled pork tenderloins, steaks, broasted chicken and even a wood fired pizza menu. Since we were there at lunch they had not yet fired up the wood oven, so Katie chose a generously sized and juicy cheeseburger with fried mushrooms and I went with the Iowa classic- the tenderloin. The tenderloin was fantastic- one of the best I have ever had and it came with crinkle fries- the absolute BEST crinkle fries I have had in forever. If our simple sandwiches were any indication of the care and quality of the rest of the food, this town has a goldmine right on the main street. 


After lunch we headed up to the outlet mall. Kitchen Collection was our destination and I wasn't five feet in the door before I found something I have been wanting- a mandolin. A few feet later was a wall of cast iron. Knives, utensils, linens, gadgets, seasonings, small appliances, cookware, dishware, coffeemakers and tea pots- everything a foodie could possibly want and at incredible prices. A few items mysteriously fell into my cart of course.  After the kitchen store we hit a couple clothing stores, jewelry, chocolate and sporting goods shops, and an Amana store where you can get Amana products like pickles, jams cheeses and so on. 

The sky was darkening and storm clouds threatened so we headed back towards the city, thankfully missing the crummy weather. We didn't make it to the winery because we had Pupcake with us so we made plans to head that way again soon, and you know we'll tell you all about it.

So what did I buy at the kitchen outlet? Just a couple things. A handy small blender for making smoothies and shakes- so I probably will share some recipes and suggestions with that in the future and I also purchased a mandolin. Now, just to get you up to speed about ten years ago I bought a mandolin. LOVED that thing, I was so excited to use it and its many exchangeable blades for different types of cutting. The very first time I used it, I was slicing onions and cucumbers for salad. Silly me, holding that onion, I didn't think I needed that safety guard- I'm a seasoned pro, right? WRONG! I ended up cutting my thumb in a very horrible way which ruined the salad and absolutely ruined my day, and many to follow as the pain was one step away from unbearable. I threw the mandolin away swearing them off for life. Seeing chefs on cooking shows using them with their unprotected hand gave me the creeps- seriously, like it made me queasy. They always WHIZ through slicing things and I fear for every finger on their hands.


Fast forward ten years and here I am again. Wiser. Much wiser, and also very willing to accept the fact that the safety guard is provided for a reason, and I will be using it. I have a couple veggies to play with so let's play with the new mandolin. Since I am such a sucker for a good potato, that was my first vegetable to play with. I had a sweet potato and russets, so I went with the russets. I carefully unpacked the mandolin from its packaging, where it was all safe and snug in a relatively small box. I knew right away this was NOT going back in the same box- no way, no how. Anyway, the unit comes with the v-shaped cutting blade in place. There is a safety cover on and to be honest, I damn near cut mu hand off trying to get the safety cover off. Whoever designed this- let's just say I don't like you much. I did NOT touch the blade but eyeballed it from a safe distance. The attachments include a julienne slicing blade (I left that securely wrapped up) and two more slicing adjuster things- basically you swap them out on the unit for thick, normal and super thin slices. The unit is set up for super this straight out of the box. Those attachments are easy to remove, there is a push button and they pop right off. The base and "runway" are sturdy and don't slip around on the counter.


The food safety guide thing- I wouldn't even think of not sing it this time around. Following the instructions that came in the box I cut the potatoes in half first then stuck them on the pins in the food guide. There are a bunch of pins in there and they held the potatoes firmly in place. I gathered my guts and started slicing and guess what? I got potato slices with NO FINGER MEAT!! So excited! Since I had left the thinnest slice attachment in I had slices you could easily have made homemade potato chips with. Instead, since I don't like deep frying at home, I made a dish similar to Potatoes Anna but I call it Potatoes Erika because my mom always made this.


I used a medium skillet and added a good swirl or rosemary Sinful Food olive oil and heated until the oil was screeching hot and very fragrant, then I placed the slices in the pan overlapping and covering the bottom and built up until I had used all the potatoes and seasoned well with salt and pepper. I turned the heat down to mediumish and covered the pan to make sure the potatoes cooked through. I left them untouched for about 10 minutes and then checked them- the bottom was nicely browned and crisp. Grab a big spatula and flip them over (after drizzling a touch more oil over) and cook uncovered until the bottom is also browned and crisp. Slide out of the pan and slice into wedges to serve.

Get your Sinful Food oils by clicking HERE.


I ate the whole thing. Ha!! It was only two potatoes to begin with so it wasn't piles of food, and you know what? I wasn't that scared! I actually like how this mandolin performed and cleanup was super easy- I used running water and a brush on a LONG handle- piece of cake! As I predicted, it did not go back into the box so I'll have to figure out a good way to store this but I guarantee I'll use this again and again, in fact........ I have something in mind for a post in the very near future! Stay tuned!

Tuesday, April 18, 2017

Things I've Learned From Food Network

The Chef and I often sit and watch Food Network for hours and hours. Like some people yell at the television during sports, he and I will yell at the chefs and competitors on cooking shows- Noooo!!! Don't use that knife!!! Hurry and get it on the plate! You can't fry THAT!! OMG you overcooked the tuna!!! We'll yell, stress out, get excited, experience disappointment just like during football season, no thanks to you, Minnesota Vikings. We especially like watching Chopped. The mystery baskets always contain crazy ingredients and quite often, something we have never heard of. One of us will google it and find out whatever the strange ingredient might be- caul fat, hiutlacoche, unusual vegetables and ethnic foods. We have learned tons just from watching. 


Molto Mario was another show we loved. Mario Batali is a human encyclopedia of food knowledge. Every episode he talked about not only the food he was preparing, but wines that pair well and the region of Italy from where the dish originates. While I have visited Italy and experienced authentic Italian foods, not just the Americanized versions, the Chef has not, and he really picked up a lot of ideas and inspirations from Mario. Other notable chefs from Food Network that I have followed over the years include Sarah Moulton, Ming Tsai, Michael Chiarrello, and Ina Garten.


Food trucks feature prominently in several programs on Food Network. The food truck phenomenon is just beginning in our city, as the city council was a little reluctant to grant permits, but after a couple years we are finally on trend. Seeing these shows made us consider that as a business opportunity, and who knows- maybe we will. It's fascinating to see all the unique food these trucks serve and how talented their cooks are to be able to manage a small mobile kitchen. Pretty incredible really.


Myself, I have become familiar with ingredients and foods I had never heard of. Things like sea beans, durian and jackfruit were unheard of in the middle of Iowa, but thanks to Food Network I now am always on the hunt for these things. I've been able to try dragonfruits, carambola, rambutans, purple sweet potatoes, I've made own kimchi, and learned that jackfruit is not just a fruit, when cooked properly it has a texture much like pulled chicken or pork and can be substituted for those meats in different dishes. Crazy! I have been able to fine tune my baking skills in a big way with all the shows that focus on baking and desserts. This has been a huge benefit for me especially in breadmaking. 

This recipe was featured on the Food Network show The Kitchen. Prepared by Jeff Mauro, it's a super easy recipe to pull together. Jeff prepared the shrimp and half the amount of sauce I used but served the shrimp in lettuce leaves with no added vegetables or rice. I made the recipe more like an entree by adding baby corn, bell pepper and water chestnuts, doubled the sauce and served over rice. You can add your favorite veggies, like broccoli, snow peas, carrots, whatever you like. The heat in the sauce is pretty substantial so if you like things less spicy cut back on the sriracha or leave it out entirely. It will still be delicious. 

Bang Bang Shrimp with Vegetables
*Inspired by Jeff Mauro's recipe 

2 packages frozen popcorn shrimp (total 4-6 servings)
1 can baby corn
1 can sliced water chestnuts
1 large bell pepper
1/2 cup sweet chili sauce
2 tablespoons sriracha
3 tablespoons honey
3 tablespoons mayonnaise (NOT Miracle Whip)

Heat the oven according to package directions.

Spread the shrimp out on a large baking sheet.  Cut the bell pepper into 1 inch chunks. Add to baking sheet. Add the drained sliced water chestnuts. Drain the baby corn; cut each cob into four pieces. Add to baking sheet.

Place in hot oven and bake as long as instructed on the box, usually about 15 minutes.


Stir remaining ingredients together in a small bowl.


When the shrimp and vegetables are done, place in a large mixing bowl. Pour the sauce over, tossing to coat evenly. Serve immediately with rice, if desired.


I don't normally use commercially prepared foods in recipes but after seeing this on Food Network I just had to. I used instant rice as well and had dinner on the table in under 20 minutes, and that was a great bonus, not just for me on a lazy Thursday but for millions of busy families that barely have time to breathe between work, kids and real life. So, I have to admit I've also learned that it's ok to use prepared food products once in a while and even chefs do it from time to time. 

Disclosure of Material Connection: I have not received any compensation for writing this post. I have no material connection to the brands, products, or services that I mentioned. I am disclosing this in accordance with the Federal Trade Commission's 16 CFR, Part 55: "Guides Concerning the Use of Endorsements and Testimonials in Advertising."

Friday, April 14, 2017

McGuyver Dinners- Unstuffed Peppers

Some of the funniest moments in my life took place in a townhouse in Johnston, where my best friend Ronda and I were starting new chapters in our lives. She was starting over in a new city, and I was starting over as newly single. Our friendship is a fun mix of eclectic things- some we have in common, some we couldn't be more opposite if we tried. I'd be lying if I said we didn't have a few cocktails over the time we lived there. We had a fully stocked bar!  Some of our crazy antics included driveway bowling, numerous Jager bombs, and driving through snowdrifts in my SUV. Let's just say this last antic was not so successful.

Anyway, lots of times two adult women looked at the contents of our pantry and bemoaned the selection. Not wanting to go to the store or order delivery, I was usually assigned the task of coming up with a dinner. Ronda would always say that I could take black pepper and an ice cube and come up with a three course meal so, like McGuyer and his crazy paper clip and rubber band saves he day storylines, we just started calling it McGuyver Dinner. I've made many many McGuyver Dinners over the years. It's really not that hard, since I've always got some basic ingredients on hand like some kind of pasta or grain. Making a sauce or gravy isn't too difficult if you keep canned soups, broth or soup bases, or even tomato products on hand. Throw a few things together and you've got a, hopefully, tasty dinner.

Today The Chef was going through our cabinets and came upon my grain stockpile. At any given time I have an assortment of eight or nine grains on hand- everything from rice to quinoa to millet to amaranth. I love trying the ancient grains and using them in recipes. The textures are so varied, the flavors so unique. Some grains, like farro and kamut, look similar to rice. Farro is a larger grain and takes longer to cook than rice. Kamut has a chewy texture and remains firmer than rice. After piling every bag and package of grain from my stash on the counter, I decided to go with the kamut. Kamut is a great source of fiber and protein too, and who doesn't want that? 

I had some bell peppers and mushrooms to use up, so I thought I'd got for an inside out stuffed pepper type dish using Sinful Food products. The Signature Seasoning is great for replacing the salt and pepper. I had just a little bit of garlic olive oil left so I used that and also used he jalapeno oil. It was perfect- the jalapeno added just the slightest bit of heat and another layer of fresh pepper flavor.  Here is my recipe- 

McGuyver Unstuffed Pepper Soup

3 bell peppers
1 large onion
8 oz package mushrooms
handful fresh garlic cloves
1 lb ground beef
1 28oz can crushed tomatoes
2 tablespoons Italian seasoning
2 cups uncooked kamut
6 cups beef broth
Sinful Food Signature Seasoning
Sinful Food garlic and jalapeno olive oils

Chop the bell peppers, onions and garlic. Heat a couple tablespoons of garlic olive oil and jalapeno olive oil in a LARGE stockpot. Add the chopped vegetables and season. Cook over medium high heat until softened. Remove from the pot.


Add the ground beef to the pot and break up. Cook until browned and cooked through. Drain any accumulated fat. Return the vegetables to the pot and add all remaining ingredients. 


Bring to boil, reduce heat and simmer, covered, about an hour until the kamut is tender.


The kamut will not be as soft as rice. It retains it's chewy texture, which I loved. I originally intended this to be more of a casserole-type dish but instead we ended up with a pot of a delicious and hearty soup. I was happy with the result. Kitchen disaster averted!! 

To get your own Sinful Food olive oils and seasonings, click HERE.

Disclosure of Material Connection: This is a "sponsored post." As a Brand Ambassador, the company who sponsored it compensated me via a cash payment, gift or something of value. Regardless,  I only recommend products or services I believe are of good quality and safe. I am disclosing this in accordance with the Federal Trade Commission's 16 CFR, Part 255: "Guides Concerning the Use of Endorsements and Testimonials in Advertising."

Tuesday, April 11, 2017

Three Meals with Blue Apron- Part 3

Sadly it's the third installment and final meal in our Blue Apron box. I have been so impressed by the quality of the food in these pre-planned meal boxes, and the step by step directions are so precise and easy to follow literally anyone can turn out a chef-quality meal at home. Not one of these meals took more than 30 minutes to prepare. I didn't spend a single minute grocery shopping or planning. They did it all for me! With these meal packages, there is absolutely no reason to visit a drive thru ever again.

Today's recipe is very French-inspired and features two things I truly love- chicken and lentils. This recipe is unique in that is features two salads- the lentils are tossed with vinaigrette and served as a warm salad, along with a fresh salad of arugula and radish. So French! Lentils are so good for you, protein packed and with the chicken breast you've got a healthy and filling meal. The box came with three fresh radishes for the salad, but I still had a couple watermelon radishes in the fridge that needed to be used soon, so I used one of those in place of two of the radishes in the box and snacked on the extras while cooking.  Let's get started.

The ingredients are:

2 boneless skin-on chicken breasts
1/2 cup French green lentils
3 cloves garlic
1 scallion
3 radishes
2 oz arugula
1 lemon
2 tablespoons crumbled feta cheese
2 teaspoons Dijon mustard
2 tablespoons verjus blanc*
1 teaspoon lentil spice blend**

*Verjus blanc is a unique form of grape juice used for cooking. It's similar to an alcohol-free wine. Blanc is a white grape juice.

**Lentil spice blend contains ground thyme, ground bay leaf, mustard powder, ground white pepper

Cook the lentils- Heat a medium pot of salted water to boiling on high. Using your fingers, inspect the lentils for any pebbles; discard the pebbles. Rinse the lentils and drain thoroughly. Once boiling, add the lentils to the pot of water and cook, uncovered, 24 to 26 minutes, until tender. Drain thoroughly and return to pot. Set aside in a warm place.


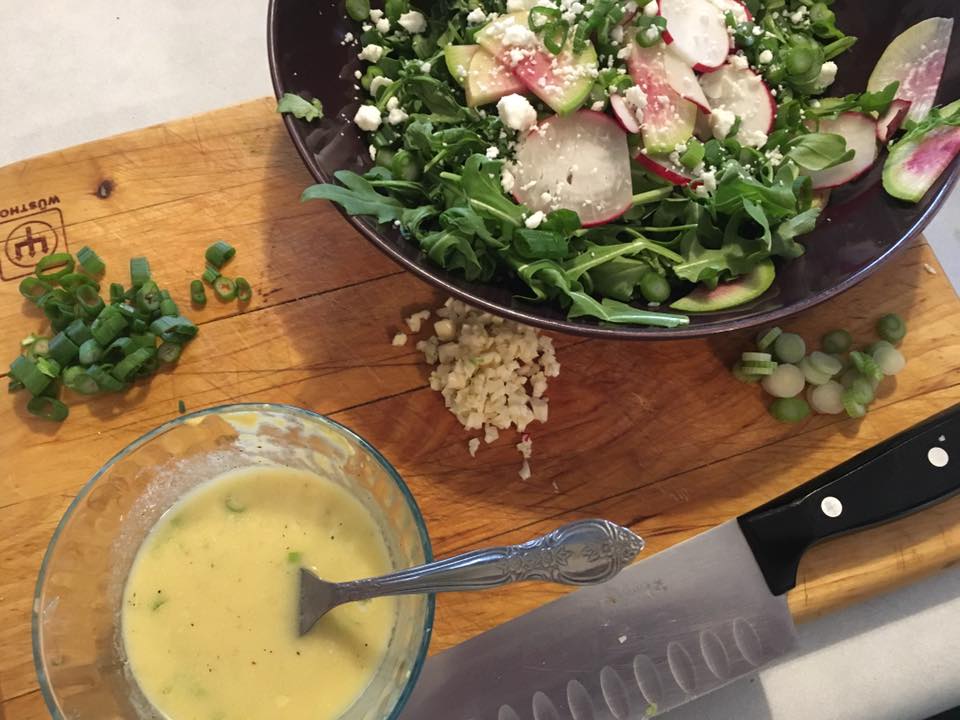
Prepare the ingredients- While the lentils cook, wash and dry the fresh produce. Cut off and discard the root end of the scallion; thinly slice, separating the white bottom and green top. Quarter and deseed the lemon. Peel and roughly chop the garlic, cut off and discard the ends of the radishes; thinly slice into rounds.


Make the vinaigrette- While the lentils continue to cook, in a bowl combine the mustard, half the white bottom of the scallion and the juice of all four lemon wedges. Slowly whisk in 1 tablespoon of olive oil until well combined; season with salt and pepper.

Cook the aromatics- While the lentils continue to cook, in a medium nonstick pan heat 2 teaspoons of olive oil on medium high heat until hot. Add the garlic, spice blend and remaining white bottom of the scallion; season with salt and pepper. Cook, stirring constantly, 30 seonds to 1 minute or until fragrant. Add the verjus blanc and cook, stirring constantly, 30 seconds to one minute or until the verjus has cooked off. Transfer to a bowl, wipe out the pan.

Cook the chicken- while the lentils continue to cook, pat the chicken dry with paper towels; season with salt and pepper. In the skillet, heat 2 teaspoons olive oil over medium high heat until hot. Add the seasoned chicken, skin sides down, and cook 5 to 6 minutes per side, or until browned and cooked through. Remove from heat.

Finish and plate your dish- To the pot of cooked lentils, add the cooked aromatics and half the vinaigrette; stir to combine thoroughly. Season with salt and pepper to taste.


To make the salad, in a large bowl combine the radishes, arugula and cheese; season with salt and pepper. Add enough of the remaining vinaigrette (you may have extra vinaigrette) to coat the salad. Gently toss to combine. Season with salt and pepper to taste.


Divide the finished lentils and salad between two dishes. Top the lentils with the cooked chicken. Garnish the chicken with the green top of the scallion.

Doesn't that look fantastic? The watermelon radish slices added pretty color and I served the chicken sliced rather than a whole uncut piece of meat. I made this one evening that The Chef was working so the second plate I combined everything and tossed to make a protein packed salad for lunch the next day. It was perfect at room temperature. 


If you hate shopping but LOOOOVE eating healthy and beautiful food, I highly recommend you check out Blue Apron. It's exceptional quality and huge time savings make it a great option for busy people. I hope you check it out.

Disclosure of Material Connection: I received one or more of the products or services mentioned above for free with no expectation that I would mention it on my blog. Regardless, I only recommend products or services I believe are of good quality and safe. I am disclosing this in accordance with the Federal Trade Commission's 16 CFR, Part 255: "Guides Concerning the Use of Endorsements and Testimonials in Advertising."

Saturday, April 8, 2017

Three Meals with Blue Apron- Part 2

Today we are making recipe number two from our Blue Apron meal box that was gifted to us by the girls at The Spoon and Pint. You might remember our first recipe, Kale and White Cheddar Quesadillas. Today we are making burgers- Shiitake Mushroom Burgers with Miso Mayonnaise and Roasted Sweet Potato to be exact. The Chef and I love a good burger and I'm super excited to try this Asian-influenced burger with garlic, shiitake mushrooms and hoisin sauce. I'm a little anxious about the miso mayo however. My prior experience with miso is limited to soup and I thought it tasted awful, but I'm approaching this with an open mind and willingness to try something new, so here we go......

The ingredients are-

10 ounces ground beef
2 potato buns
2 cloves garlic
1 scallion
1 sweet potato (1/2 lb)
2 tablespoons mayonnaise
1 tablespoon hoisin sauce
2 teaspoons sweet white miso paste
1/4 ounce dried shiitake mushrooms

Prepare the ingredients and make the miso mayonnaise- Preheat oven to 450 degrees. Wash and dry the fresh produce. In a bowl combine the mushrooms and 1 cup of HOT water; let stand for at least ten minutes. Halve the buns. Halve the sweet potato lengthwise, then slice thinly crosswise. Peel and finely chop the garlic. Cut off and discard the root end of the scallion; thinly slice, separating the white bottom and green top. In a bowl, combine the miso paste and mayonnaise; season with salt and pepper.


Roast the sweet potato- Line a sheet pan with aluminum foil. Place the sweet potato on the prepared sheet pan. Drizzle with olive oil and season with salt and pepper; toss to thoroughly coat. Arrange in a single, even layer. Roast 16-18 minutes, or until browned and tender when pierced with a fork. Remove from oven, leaving the oven on, and transfer to a plate. Set aside in a warm place. Discard the foil.


Form the patties- While the sweet potato roasts, thoroughly drain the mushrooms (discarding the water) and transfer to a cutting board. Finely chop. Transfer to a large bowl. Add the ground beef, garlic, hoisin sauce and white part of the scallion, season with salt and pepper. Mix gently to combine. Using your hands, form the mixture into two 1/2 inch thick patties, transfer to a plate.


Cook the patties- While sweet potato continues to roast, in a medium skillet heat 2 teaspoons olive oil on medium high heat until hot. Add the patties and cook 3 to 5 minutes per side for medium rare, or until browned and cooked to your desired doneness, transfer to a plate and set aside in a warm place.

Toast the buns- Place the buns, cut side up, on the sheet pan and toast in the oven for  3 to 4 minutes or until the edges are lightly browned and crispy. Remove from oven and transfer to clean, dry work surface. 


Assemble burgers and plate your dish- Spread a layer of the miso mayonnaise onto the cut side of the toasted buns. Top the bun bottoms with the cooked patties. Complete the burgers with the bun tops. Divide the burgers and roasted sweet potatoes between two dishes. Garnish the sweet potato with the green top of the scallion.

So how was it? Delicious! The burger was so juicy from the added mushrooms. They really added a ton of moisture and flavor to the meat. The garlic, hoisin sauce and minced scallions (I minced the white part so they would mix into the burger more evenly) gave the juicy meat an Asian flavor. Remember how afraid I was of the miso? It was delicious!! It added a different level of flavor to boring mayo- lightly sweet, definitely savory. I think this might encourage me to try more miso recipes.

The only drawback was the one burger per person in the recipe. That's fine for me but The Chef is a growing boy- he usually eats a couple burgers. To make up for it we supplemented the sweet potato with an extra sweet potato and increased the olive oil accordingly. Also, after I took my picture I picked all the green scallion tops off the potatoes and put them on the burger as well- I highly recommend doing the same.

This meal was absolutely my favorite of the three and something I will make again, thanks to the enclosed recipe card!

Disclosure of Material Connection: I received one or more of the products or services mentioned above for free with no expectation that I would mention it on my blog. Regardless, I only recommend products or services I believe are of good quality and safe. I am disclosing this in accordance with the Federal Trade Commission's 16 CFR, Part 255: "Guides Concerning the Use of Endorsements and Testimonials in Advertising."