Showing posts with label stock. Show all posts

Monday, December 28, 2015

Dragging home the skeletal remains again

Usually I'm hauling home the turkey carcass. Or a big pile of beef bones. This time however, it's a nice big monster of a ham bone from the middle of the spiral sliced ham lovingly prepared by my son in law for Christmas Day dinner. Yep, as I have said before, I am THAT relative, the one who asks "are you gonna save those bones?" as I'm getting ready to head home.

A lot of my canning friends make and can ham stock. I don't really use all that much ham stock. Generally speaking I make one pot of stock after a holiday, which evolves into one big pot of ham and beans and then leftovers get frozen in individual portions for lunches and solo dinners. So while it's not something I make gallons of, I do like to make one big stockpot full. Making the ham stock is easy- throw the bone and any meat clinging to is in a large pot. Cover with cold water. Add seasonings- I used a chopped onion, 4 cloves chopped garlic, 3 bay leaves, a palm full of whatever herbs on my shelf looked good to me- thyme, parsley, basil, marjoram, and a couple big grinds of pepper. Lay off on the salt at this point- ham is salty and you can always add more later but you cannot remove it if you oversalt. Bring to a boil, reduce heat, cover and simmer for several hours. After a while prop the lid open a little to let the stock reduce slightly- it intensifies the flavor.

Remove the ham bone and set aside to cool. Pop that pot of stock in the fridge overnight (strain it if you like) to let the fat harden on the top. Scoop that off and discard the next day. When your ham bone is cool enough to handle, cut off any remaining meat and throw it back in the stock. I don't strain my stock. I will fish out the bay leaves if I can but I don't freak out over them. Lots of meaty bits come off that bone during simmering and I want that to stay in my soup. Add the meat you've cut off the bones back to the stock in the pot. Now you can either continue on with your soup or divide the broth into freezer containers and freeze (you CAN process in a pressure canner and jars but I never make a big enough batch to bother with that).

I am continuing on with my soup today, so I have also soaked one and a half pounds dried beans. I used a mix of navy beans and pinto beans, roughly half and half. I always prefer to soak beans overnight versus the quick soak method, I think the beans are more tender and cook without falling apart as much. Drain the beans and rinse. Add to the ham stock and bring to boil. Reduce heat and cover, simmering until the beans are tender which can be a while depending on your beans. Expect about an hour, and sometimes two. 

During the last 45 minutes or so of cooking I sometimes add chopped carrots and sometimes diced potatoes. I had no carrots on hand but I did dice up a couple small potatoes and added those. They thicken up the broth and really bulk up the soup. Served with hot and buttery cornbread, crusty rolls or breadsticks this is the perfect winter meal and provides plenty of leftovers. Today I had half a round loaf of Italian bread to use up so I cut it into "pull apart" bread, sprinkled with some shredded Parmesan cheese and drizzled liberally with a mixture of melted butter, crushed garlic and herbs. Pop into the oven at 375 until browned and toasty and serve with the soup. So so good! The soup was the perfect dinner on an evening that includes a winter storm warning, with heavy snowfall, ice and howling winds in our future. Even the Chef, the self-proclaimed Soup Master, had compliments for the cook. The only person who was somewhat dissatisfied was Louie.....no ham bones for him!

Saturday, December 26, 2015

Cooking Basics- Mastering Beef Stock

Every good cook knows, you have to have the basics down before you can really shine in the kitchen. The basics are simple enough to master- pastry, knife skills, sauces, cooking methods and stocks. While they can seem a bit intimidating at first, you will soon see just how easily you can master them. Today we have a special Guest Cook walking us through the stock-making process so you can get a step by step look at how to make your own. 

I met Rhonda Graham in an online canning group. Like me, she knows what a huge difference homemade stock makes in your cooking. No preservatives, no overly salty fake flavors, just amazing flavors coaxed from slow-roasted and long-simmered bones and aromatic vegetables and herbs. Several other members of the canning group had asked for advice on stock-making and Rhonda stepped up to the plate, not only walking them step-by-step, but sharing pictures so the "students" knew exactly what to look for throughout the process. Both Rhonda and I recommend that you read through this post before starting out. Make sure you have everything you need before you start- bones, veggies, herbs, and away to store the finished stock. We will cover both canning and freezing.

And now, I am turning the blog over to Rhonda........

Stock is the single most effective tool a cook has to impart flavor into a dish. It's the oomph that takes an ordinary dish and makes it extraordinary, like French Onion Soup, for example. From such humble ingredients as bones, onions, bread and cheese, I cannot imagine a more incredibly satisfying dish. 

There are just as many ways to make beef stock as there are cooks in the world, and there is no right or wrong recipe. I started making stock after watching The Frugal Gourmet, Jeff Smith's Chicago-based cooking show on PBS many years ago. His advice was just make it, an no matter what recipe you use, that cup of stock will add more flavor than anything you can buy. He also advised to never even think of using a bouillon cube-  "They are nothing but salt."

Where do you get the bones?

Good beef stock should taste like beef. Since beef bones have less collagen than chicken bones, you need more beef bones to get that same rich mouthfeel that chicken stock has. Use whatever kind of bones you can get. You can usually find bare rendering bones at Asian markets, in the frozen section. If you use those, make sure to also get some meaty bones too. The more meat clinging to them the better. Knuckle bones, shank, shoulder and neck bones are preferred for stock, and you can always save up bones in the freezer until you have enough to do stock.


City Girl's Note: Rhonda recommends some great sources for bones- the Asian market, butcher shops, meat processing facilities. Depending on where you live, you may have different sources- for example where I live there is a small meat locker in a nearby town. I get bones for free there. Shop and call around before you spend much on stock bones- you might be able to score some freebies.

Choosing vegetables for your stock.

Everyone uses different vegetables, but most agree on onions, celery and carrots. Many recipes suggest using leeks, but they can be cost-prohibitive, so I never use them. Some cooks add turnips, use them if you like. Onions are the most critical ingredient, in my opinion. Julia Child and Jaques Pepin always studded the onion with a couple of whole cloves. I personally like to add a little tomato paste. It really enhances the beef taste and adds richness.

Choosing your seasonings. 

Rhonda's note- Seasonings are not added until after the roasting and we are ready to simmer. Just get them ready and set aside for later.

Many traditional recipes call for a bouquet garni or herb bouquet, basically a few parsley sprigs, thyme sprigs, a bay leaf or two and some whole peppercorns. Don't add salt, you want a stock that is as versatile as possible. In some recipes you will be reducing the stock, and if it's been salted- you will have a very salty reduction.

Add a sprig of thyme, some parsley, bay leaves and black
peppercorns to help flavor the stock.
Garlic is optional. I don't add it but many people do. Since I consider stock as a building block for future dishes, and I don't add garlic to every dish, I just choose to leave it out. Julia Child adds a couple of cloves, smashed, to her stock recipe. Some chefs use the entire unpeeled head of garlic, cut in half crosswise. Again, the choice is yours.

Getting everything ready for stock. 


Here are the bones we'll be using. I didn't have room in the fridge, so the bones were kept on ice overnight in a cooler. Rinse them off well and dry them. If they are wet they won't brown properly in the oven and you won't have that nice deep color. If desired, you can rub the dry bones with a little olive oil, as chef Hubert Keller recommends. Julia and Jaques do not and I don't either. They will give off fat during the roasting period anyway. After roasting, the bones should be deeply browned. Like searing a roast or a steak, browning is your one chance to get good color in the stock. 

Oxtail and beef soup bones make nice "meaty" additions
Arrange the bones in a roasting pan in a single layer, and don't pack them tightly. If you don't leave room in the pan they will just steam and not brown. You may have to roast in more than one pan or in batches. Roast in a 400 degree oven for an hour to and hour and a half, turning the bones occasionally. You want very well-browned bones but not burned. When you start the bones roasting, this is the time to prep the vegetables. Now, traditionally cooks did not peel any of the vegetables. Since I plan to pressure can my vegetables, I want to make sure I leave bacteria no hiding places so I peel all vegetables. Chop roughly into 2 inch chunks and pieces. Onions can be halved or quartered. Halfway into the cooking time, add the chopped vegetables and this is also when I like to spread the tomato paste on some of the bones. I usually use about half of a 6 ounce can, or a couple tablespoons.

Bones, partially roasted, vegetables and a bit of tomato
paste for richness- ready to go back in the oven

The bones have a beautiful caramelization and look at how
the tomato paste roasted onto the bones, sweet  and rich.

Adding wine or vinegar to the stock. 

Many cooks use wine to deglaze the stock pots and add that to the stock. I don't add wine. If I'm making a sauce I'll add the wine then. Some people like to add vinegar too- just a tablespoon or two. Again, I do not, but you have that option.

You definitely want to deglaze, even if just with water. There
is so much flavor concentrated on the bottom of the pan that
you don't want to leave behind.
Transfer meat and vegetables to a stockpot. Deglaze roasting pan and add that liquid with the browned bits from the pan to the pot. Cover bones and vegetables with cold water and bring pot to a low simmer. You will start to see scum forming on the top. Skim it off as it accumulates. It will eventually stop.


Once the scum has stopped forming is the point when I add my seasonings- the bouquet garni. You can use a cheesecloth bag or square (tied up), a tea ball or just throw it in. This is why I wait until the skimming part is pretty much over- so any loose aromatics don't get skimmed out. Let the stock simmer, NOT BOIL, at least 12 hours or overnight. You don't have to cover, but if you do, leave the lid ajar a bit.

Add your aromatics now that the skimming is done.
Now that Rhonda has walked you through making stock, we want a way to store it. You have a couple different options here. For shelf-stable storage that doesn't take up valuable freezer space, you can pressure can your stock, and if you don't have a canner or don't want to can it, you can freeze it.

First we are going to strain our stock. Remove as much of the big stuff as you can- bones, vegetable pieces, etc. Line a colander with cheesecloth and place over a large bowl or clean stockpot. Pour in the stock and allow it to drain and drip through.

We also want to remove the excess fat, so pop the stock into the fridge for several hours or overnight. Scoop off the cooled fat and discard. If you are going to freeze your stock, you can just ladle or spoon it into freezer containers, label, date and pop in the freezer. If you want to can the stock you must have a pressure canner. Prepare your jars and lids. Reheat the stock to boiling, ladle into hot jars, seal and process at the correct weight for your altitude for 20 minutes for pints, 25 for quarts. Complete canning instructions can be found HERE. 

Now you are a stock master! You'll never look at bones the same again, and you also have the base for loads of great meals in the future- soups, roasts, gravies, sauces and braises. 


Sunday, December 13, 2015

Tis the season- for turkey carcasses

I am that relative. Yep, you know the one- the crazy aunt or goofy grandmother who comes to holiday dinner and ends up going home with a plastic bag full of turkey remnants. It was easy to hide when I was the hostess cooking and serving dinner, but now our family has handed to reigns to the next generation of cooks and I no longer have to do it. I still make my own stock however so I need those old turkey bones!


Turkey (or chicken) stock is a pantry staple for me. It is one of the most versatile ingredients you can have. A pot of homemade soup in a snap. Gravy? Just heat, thicken and pour over. The uses are endless. Making you own stock is so easy and rewarding- you have all that slow simmered flavor without all the added junk and preservatives and artificial flavors. Storing stock for future use is super easy as well- pour into freezer containers and freeze, or if you're a home canner, you can process in jars for shelf stable stock. Let's get busy in the kitchen.

Bones. All stock begins with bones. For me, the best time to make a batch of stock is during the holiday season. I can always find a turkey frame somewhere. I've been known to keep a giant ziploc bag of chicken bones in the freezer also, waiting until I have enough to make a batch. If you are not the holiday meal host, go ahead and ask if the host will part with the frame! Can't hurt! 

It's not the prettiest sight, but there is a ton of flavor
in those bones!
Once you have a good amount of bones you can start planning your stock. Browning the bones is a very important step in making beef stock but it's not a necessary step in poultry stock. If you choose to roast your turkey bones, break the carcass apart and place in a large bowl. Drizzle with vegetable oil and toss to coat. Spread out onto baking sheets and pop into a 300-325 degree oven and roast until the bones are golden brown. One or two turkey frames in a giant pot (I use my water bath canning pot) is a good amount to start with. As long as I've got a pot started I'll make a last check of the freezer for stray chicken bones I might have been saving, and I'll throw those in as well.

Herbes de Provence are always part of my aromatics
Aromatics. Like beef stock, your aromatics should enhance the stock and provide some background flavors but NOT be an overdone flavor element. Remember, stock should be something that's a foundation, with your flavors being built for each individual dish. The traditional mirepoix, carrots, celery and onion, will lay the groundwork, and simple herbs- thyme, parsley, bay leaf- and peppercorns are about all you need but you can use any spices or herbs you like. I never add salt to my stock, saving this seasoning step for when I am preparing a dish with the stock. 

You don't have to fuss with peeling onions- just throw them in.
I didn't have fresh celery but I have tons of dehydrated- it
gives just the same celery flavor as fresh and stores in a jar.
Ok, so I am going to start by breaking down the turkey bones. Make sure you have picked off as much meat as you can and break the frame up into smaller pieces. Place in big stockpot. Add several bay leaves, a small palm full of peppercorns, several sprigs of fresh thyme and Italian flat leaf parsley. Add the vegetables- 2 or 3 carrots, scrubbed and cut into chunks; 3 stalks celery, washed and cut into chunks; 1 large onion, cut into chunks- you don't even need to peel it; 1 head garlic, cut in half crosswise. Our turkey was roasted with onion, garlic, thyme and apples inside the cavity- I left them in and will cook them with the stock. Fill the pot with cold tap water. Bring to boil over high heat, then reduce heat to medium low and simmer for at least 6 hours. Check the pot every once in a while and skim off any foam that's accumulated. This is a great project for a cold, gloomy day so you can let it simmer away while you settle in with a good book, some movies, or relax.

Let the stock cool slightly, then carefully remove the large pieces of bone and vegetable chunks and discard. Strain the stock through a fine sieve to catch all the herbs and small pieces. Place in pot and refrigerate overnight. The next day, scoop off any fat that has solidified on top. You won't get 100% of the fat but get as much as you can, especially if you are going to can it- excessive fat can prevent the jar from sealing.

After straining out the bones and vegetables my stock still has
some herb bits and isn't clear- but I like it this way. Here I am
condensing it slightly so I can use smaller jars and have more
flavor impact. I can always add water when I make soup later.

If you are going to freeze the stock, ladle into freezer containers, seal, label and freeze. If you want to can the stock you must have a pressure canner. Prepare your jars and lids. Reheat the stock to boiling, ladle into hot jars, seal and process at the correct weight for your altitude for 20 minutes for pints, 25 for quarts. Complete canning instructions can be found HERE. 


You now have jars of liquid gold, ready to turn into homestyle soups, rich flavorful gravies and luxurious reductions.

Friday, September 21, 2012

Boooo....I mean Mooooo....I mean YAY !!! Free Beef Bones !!

My wild goose chase has ended and I learned 2 valuable lessons.

#1. Never count on the big city grocery chain meat counters to help you out when looking for beef bones for stock making, and later, Louie snacks. My experience went like this: Enter major grocery store in Clive, browse meat selection, no beef bones, oxtail, or anything like that. A few puny short ribs but $9 each- ummmmm, no thanks. Inquire at meat counter "Do you have any beef bones suitable for making beef stock?" The "butcher" responded by saying "No, but over in the pet food aisle we have marrow bones for dogs, the shrink wrapped ones."   Sigh............I'm not making my beef stock from Alpo......

#2. Small towns are where it's at. One phone call to the locker in the nearby small town of Redfield and the answer was "Sure we do !! I can have them ready for you tomorrow."  My next question- "What do you charge for bones?" The response ?? "Oh gosh, we don't charge for bones." YAY !!!

So...... my little 15 mile or so road trip ends with me bringing home about 15 lbs of big chunky beef bones with lots of meaty bits still attached.  Of course, the smallest one immediately went to Louie, who occupied himself to the point of exhaustion with his new bone.


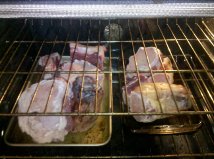
I rinsed these meaty monsters well, and placed them on pans to roast in a slow over (275 degrees) for 3 hours. While that was going on, I was able to catch up on some much needed housework, putting canned foods away, washing and cutting up carrots, celery and onion to add to the pot when it's time. I did have a pic of the veggies but since I am notoriously technology challenged, I managed to delete them- but you know what a carrot looks like.


My next dilemma was WHAT IN THE WORLD, or this house at least, am I going to cook all this beef stock in ?? Easy solution !! The water bath canner !!! So out of the oven and into the pot went the roasted beef bones (with all that excess fat rendered away) and the vegetables, a good big fat pinch of salt and a palmfull of peppercorns. I'm just going to let this amazing smelling pot of love simmer as long as possible- maybe overnight ?? I'll have to remove some shelves from the fridge to fit it in there to chill !


It's too close to bedtime to drag out the canning equipment and I don't think I've had enough simmer time to really make it yummy, so into the fridge the pot went, tomorrow I'll simmer for another 2-3 hours and see what it tastes like. Might be doing some canning !!!

Day 2 of stockmaking is going famously. Since it was in the fridge overnight I was able to skim off alot of the fat and get rid of that. Then I added 2 whole heads of garlic (just cut in half with the papery junk removed), a whole pile of parsley and several bay leaves. This will be the last night of simmering. I let it go for about 3 more hours and then skimmed off the delicious stock and had a HUGE pile of discarded bones and vegetables.


One more night in the fridge, one last chance to skim off the fat then tomorrow it's strain and heat and can this amazing beef stock!!

Alright......Friday night has arrived and the canning procedure is beginning. First step, make sure all the jars are cleaned, heated, and lids are hot and ready to go.


Next, remove stockpot from the fridge and skim off the last of the fat (which was TOTALLY gross because stock made from bones always has that gelatinous quality that is oh so gross if not cherry flavored) and then heat the stock to boiling.

Remember, I had to make the stock in the BWB- it was the only pot  I have that was big enough 
I set up my little assembly line- pressure canner filled and simmering, stock heated to boiling, jars and lids hot and ready, scoop, strainer and funnel, lots of paper towels and I'm on my way. Some people use a ladle to fill jars but amazingly, I don't have one, so I use a Pyrex measuring cup with a pour spout and poured it through a fine strainer placed in the funnel, placed in the jar.  Fill to correct headspace, wipe rim and fix lids and rings and into the simmering water in the canner they go. Repeat until canner is full !


Process according to your area- for me it's 15 lb pressure for 25 minutes for quarts. Then you know the drill- remove from heat and let canner reduce pressure to zero before opening. And at the end of my loooooong stock-making project I ended up with 9 quarts of beef stock, 100% homemade with not one thing artificial added!


Ingredients:

Beef bones with bits of meat attached (I had about 12 lbs)
4-5 carrots, cut into thirds
5-6 stalks celery, with leaves, cut into thirds
one large onion, quartered
2 heads garlic, cut if half crosswise and most of papery skin removed
BIG bunch fresh parsley
1 cup cabernet sauvignon
water to fill stockpot

That's it !!